This blog post is about how you can add new beans to the container in Spring.
In this case, our container already contains a large number of Spring-managed beans, and we’ll look at why. But the central question is: How can we get our own components into the container?
Fill Container with Beans
Basically, there are two different approaches: declaratively or by registering components manually. Declarative means that the container recognizes and registers components on its own via a “magic” mechanism. There are two different ways to do this. One is the modern approach of using annotations to declaratively mark components so that they can become a Spring-managed bean. The other way is somewhat older. Here the components can be described via XML files, so that Spring can register the components after reading the XML file.
The modern approach is shown next with an example.
Abstraction of a File System: FileSystem: The first thing we want to do is develop a component for an abstraction of a file system because in our Date4u application, it should of course be possible to store photos. The photos could be stored in a database, but a relational database is less suitable for this. There are multimedia databases that can handle large amounts of data, but we simply want to use the file system.
To abstract from directories, we want to implement a FileSystem class for a logical file system:
public class FileSystem {
private final Path root =
Paths.get( System.getProperty("user.home") ).resolve( "fs" );
public FileSystem() {
try { if ( ! Files.isDirectory(root) ) Files.createDirectory(root); }
catch ( IOException e ) { throw new UncheckedIOException( e ); }
}
public long getFreeDiskSpace() {
return root.toFile().getFreeSpace();
}
public byte[] load( String filename ) {
try { return Files.readAllBytes( root.resolve( filename ) ); }
catch ( IOException e ) { throw new UncheckedIOException( e ); }
}
public void store( String filename, byte[] bytes ) {
try { Files.write( root.resolve( filename ), bytes ); }
catch ( IOException e ) { throw new UncheckedIOException( e ); }
}
}
This logical file system uses a part of the physical file system, namely a subdirectory fs in the user directory. The root directory of the logical file system is available in the root instance variable for the method calls. All resources are stored in this fs directory. The constructor checks if this directory exists and, if not, creates it.
The following methods are used:
- getFreeDiskSpace() returns the free bytes. Because Path doesn’t have any methods to request the storage space, the query runs via class io.File.
- load(…) loads a file. The path is composed of the root and the passed file name. The checked exception is caught and wrapped in an UncheckedIOException.
- store(…) stores a byte array and also resolves the path relatively. The exception handling is the same as for load(…).
@Component
The FileSystem class is a regular class with a parameterless constructor. We could easily instantiate this class with new. However, we no longer want to instantiate this class ourselves, but it should be created and registered by the Spring Framework. There are several ways to do this: declaratively via XML, declaratively via annotations, or programmatically with code.
We want to take the approach of using an annotation to tell the framework that the class is a component and should be automatically recognized. The most general annotation is called @Component. We write the following:
@Component
public class FileSystem { … }
The annotation comes from the org.springframework.stereotype package, and it’s clear: this is an annotation from Spring Framework and has nothing to do with Spring Boot. The annotation type header looks like this:
@Target(ElementType.TYPE)
@Retention(RetentionPolicy.RUNTIME)
@Documented
@Indexed
public @interface Component {
// …
}
The annotation type @Component is itself annotated, which is called meta-annotations.
The @Target(ElementType.TYPE) value indicates that @Component may only be attached to type declarations. @Retention says that the annotation is accessible at runtime via reflection. The use of @Documented expresses that a placed @Component annotation itself appears in the Java documentation of that class, and @Indexed is a special notation from the Spring context.
If we start the Date4u application and ask for a list of all components, the file system would show up under the name “filesystem”.
In summary, all classes annotated with @Component are automatically detected, instantiated, and come into the container’s belly as a Spring-managed bean. One reason for this is the annotation @SpringBootApplication.
SpringBootApplication Annotation: Let’s recall the first program:
@SpringBootApplication
public class Date4uApplication {
public static void main( String[] args ) {
SpringApplication.run( Date4uApplication.class, args );
}
}
The class was annotated with @SpringBootApplication. Let’s take a closer look at this annotation. The declaration is as follows:
2
@Target(ElementType.TYPE)
@Retention(RetentionPolicy.RUNTIME)
@Documented
@Inherited
@SpringBootConfiguration
@EnableAutoConfiguration
@ComponentScan(excludeFilters = {
@Filter(type = FilterType.CUSTOM,
classes = TypeExcludeFilter.class),
@Filter(type = FilterType.CUSTOM,
classes = AutoConfigurationExcludeFilter.class) })
public @interface SpringBootApplication {
…
}
Annotation @SpringBootApplication is a compound annotation type. For example, it’s annotated @ComponentScan; we’ll discuss the filters later. Annotation @ComponentScan gives the Spring Framework a clue that it should automatically search for annotated types when the container starts. If @ComponentScan is missing, the components won’t be recognized.
Root of Classpath Scanning: If the container is started with run(…), the Spring Framework searches for @Component annotated types. Now you need to know different things, for example, that it doesn’t search for annotated classes everywhere—that would be a bit much. There is a restriction on where the container starts searching. By default, the container starts at the package of the main configuration, which, in our case, is the class with the main(…) method.
Let’s assume the following package structure:
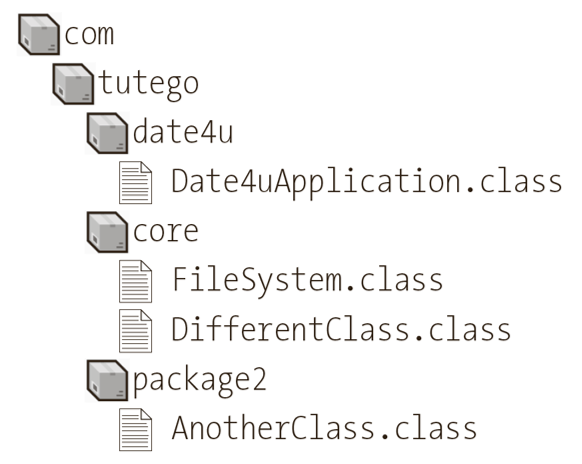
If the main(…) method is in a class in the com.tutego.date4u package, then, by default, the container searches in that package, including all subpackages.
If these types are in completely different packages, such as de.javatutor, then these classes would not be recognized by default. Classpaths can be added, of course, and this is important—especially when we mix software from other teams that have a different package structure. Then these packages must be explicitly included; we’ll discuss how to do this later.
The reason not all classes from all packages are searched is, among other things, the performance. Opening the appropriate class files and looking for whether an annotation is set comes with computing time costs, which we want to avoid. Therefore, the search is limited to the classes that lie in our own package and in the subpackages.
Note: Types should never be in the default package, which is the unnamed package. This is bad style to be avoided.
Let’s briefly repeat the process of classpath scanning: The moment the container starts with run(…), it will know via @ComponentScan that it should start classpath scanning. It will get a list of all classes, open it and look inside. If those classes are annotated with @Component (there are other annotations, more on that in a moment), then the container will automatically instantiate that class. A Spring-managed bean is created, put into the container, and appears consequently with getBeanDefinitionNames().
@Repository, @Service, @Controller
Besides the @Component annotation, there are other annotations that lead to a new Spring-managed bean. We want to get to know @Repository, @Service, and @Controller. These annotations are called semantic annotations. Here, the term stereotype actually fits a bit better. A generic @Component just says it’s “some component.” But components have a purpose. To better document them, there are three annotations:2
- @Service classes normally execute the business logic.
- @Repository classes usually go to data stores.
- @Controller classes accept requests from the frontend.
This results in a data flow as follows: There is a request from the client, which a controller receives. The controller delegates the tasks to the service. The service needs data, so it goes to the repository; the repository usually delivers the data from a database. The data goes back to the service, and the service delivers the data back to the controller. A controller is a component such as a REST controller for RESTful web services, or a controller for a command-line interface or for a chat interface.
So far, these three special annotations have no special semantics, which means that whether a component is annotated with @Component or with @Repository, @Service, or @Controller, basically doesn’t matter. But it can be, and so it’s written in the reference documentation of the Spring Framework that this will change in the future. So, it wouldn’t be good if a program wants to express an @Service but is set as @Repository.
Let’s come back to the FileSystem component. The generic annotation @Component doesn’t really fit; @Repository and @Service fit better. Let’s change it so that @Component becomes @Service:
@Service
public class FileSystem { … }
Our Own Composed Annotations: Let’s quickly look at the implementation of the @Service annotation type:
@Target(value=TYPE) …
@Component
public @interface Service { … }
This kind of thing is quite common in the Spring environment: annotation types with meta-annotations. We can do this as well: build our own annotation types, for example, @FilesystemService. We would then annotate this annotation type with @Service, for example, and the result would be the same: a class annotated with @FilesystemService or @Service would be recognized during classpath scanning and included as a new Spring-managed bean.
Get FileSystem from a Container via Context: Components can be specifically queried from the container with getBean(…), and so can our FileSystem. Let’s do this to write the number of free gigabytes to the console:
ApplicationContext ctx = SpringApplication.run( Date4uApplication.class, args );
FileSystem fs = ctx.getBean( FileSystem.class );
System.out.println(
DataSize.ofBytes( fs.getFreeDiskSpace() ).toGigabytes() + " GB"
);
To convert to gigabytes, you would probably use division, but the nice thing is that the Spring Framework has its own data type called DataSize for data sizes. The static factory method ofBytes(…) builds the DataSize object with bytes, and toGigabytes() returns the output in gigabytes.
Control Classpath Scanning More Precisely with @ComponentScan *
Spring can conveniently find the types itself via classpath scanning. This section deals with the configuration of the search.
Start Configuration
The run(…) method is passed a start configuration. The start configuration is either marked with @Configuration, or it’s an @Component. (@Configuration is a specialization of @Component, a Java configuration class.) Instead of passing it into run(…), this configuration can also be passed in the constructor of SpringApplication—this leads to three variants:
- SpringApplication(Class<?>... primarySources)
- static ConfigurableApplicationContext run(Class<?> primarySource, String... args)
- static ConfigurableApplicationContext run(Class<?>[] primarySources, String[] args)
The call of the static run(…) method with only a single start configuration has been selected by the Initializr:
@SpringBootApplication
public class Date4uApplication {
public static void main( String[] args ) {
SpringApplication.run( Date4uApplication.class, args );
}
}
In the run(…) method, the Initializr has used the Class object of Date4uApplication. That means, our own class is used as the start configuration. But the start configuration was the class annotated with @SpringBootApplication, and @SpringBootApplication is nothing more than a summary of, to put it simply, three annotations:
@SpringBootConfiguration
@EnableAutoConfiguration
@ComponentScan
The listed annotation @SpringBootConfiguration is in turn a specialization of @Configuration, and that in turn is an @Component. Components are automatically recognized. And the fact that @SpringBootApplication is annotated with @ComponentScan is important, and we want to take a closer look at that.
@ComponentScan + @Configuration
Annotation @ComponentScan can be used in combination with annotation @Configuration. Then, the package containing the class annotated with @ComponentScan and @Configuration, including all subpackages, is searched for corresponding components via classpath scanning.
The class with the main(…) method and the start configuration can be separated without any problems. The following would also be fine (Date4uApplication is supposed to be in the default package as an example):
// not annotated with @SpringBootApplication
public class Date4uApplication {
public static void main( String[] args ) {
SpringApplication.run( Date4uConfiguration.class, args );
}
}
The startup configuration can be found in the com.tutego.date4u package:
package com.tutego.date4u;
@SpringBootApplication
class Date4uConfiguration { }
The run(…) method gets the startup configuration Date4uConfiguration, which is annotated with @SpringBootApplication. This contains @ComponentScan and @Configuration, so the classpath scanning starts as previously at com.tutego.date4u.
@ComponentScan Annotation Type
The declaration of @ComponentScan looks like this:
@Retention(RetentionPolicy.RUNTIME)
@Target(ElementType.TYPE)
@Documented
@Repeatable(ComponentScans.class)
public @interface ComponentScan {
@AliasFor("basePackages") String[] value() default { };
@AliasFor("value") String[] basePackages() default { };
Class<?>[] basePackageClasses() default { };
boolean useDefaultFilters() default true;
Filter[] includeFilters() default { };
Filter[] excludeFilters() default { };
String resourcePattern() default …
Class<? extends BeanNameGenerator> nameGenerator() default …
Class<? extends ScopeMetadataResolver> scopeResolver() default …
ScopedProxyMode scopedProxy() default …
boolean lazyInit() default false;
@Retention(RetentionPolicy.RUNTIME) @Target({})
@interface Filter { … }
}
We’ll see in a moment how to define the start packages and how to include or exclude types using filters. The @ComponentScan type still has a nested annotation type called @Filter.
basePackages
If we use @ComponentScan and don’t use annotation attributes at all, by default, classpath scanning will start in the package where this annotated class is located. The package including all subpackages will then be included.
However, we can specify the starting package or several starting packages where classpath scanning should start. This can be solved with annotation attribute basePackages. With basePackages, an array of base packages can be set; different notations are allowed. The following configuration results in the same recognized types if com.tutego.date4u.core and com.tutego.date4u.interfaces are the roots:
@Configuration
@ComponentScan( basePackages = { "com.tutego.date4u.core",
"com.tutego.date4u.interfaces"} )
The attributes basePackages and value are aliases. That is, basePackages can be omitted for an annotation attribute:
@Configuration
@ComponentScan( { "com.tutego.date4u.core",
"com.tutego.date4u.interfaces"} )
The packages can also be in a string, with whitespace, commas, or semicolons allowed as separators:
@Configuration
@ComponentScan( "com.tutego.date4u.core, com.tutego.date4u.interfaces" )
A combination is also possible, that is, an array of strings with multiple package names:
@Configuration
@ComponentScan( { "com.tutego.date4u.core com.tutego.date4u.interfaces" } )
With basePackages, any packages can be included and added, even those that are in a completely different package hierarchy. However, then the package in which the annotated @ComponentScan type is located is no longer taken as the root package, but only the packages named at basePackages.
basePackageClasses
The problem with basePackages are the strings. These quickly cause problems when refactoring. That’s why there is an alternative way—basePackageClasses. Then, a type token is specified. Here’s an example:
@Configuration
@ComponentScan( basePackageClasses = { A.class, B.class } )
Again, @Configuration and @ComponentScan occur together, and the array specifies that classpath scanning should start at the exact packages where types A and B are located.
Of course, A and B could be any types from these packages, but this is also risky: What if classes A and B are moved to another package? Then the classpath scanning might scan the wrong packages.
The problem can be solved with empty types in the desired packages, which basePackageClasses then references. As an example, let’s assume that the classpath scanning should detect all components under com.tutego.date4u. Then, an empty interface will be defined in this package:
package com.tutego.date4u.core;
public interface CoreModule { }
Here, the interface is called CoreModule. This exact type is then referenced in basePackageClasses:
@ComponentScan( basePackageClasses = { CoreModule.class } )
If refactoring is done later and special types move to other packages, then this “module interface” isn’t moved and remains in the correct place.
includeFilters
With basePackages and with basePackageClasses, it’s possible to include all types that are in certain packages. Filters control more precisely which types should be included in the packages. For the filters, there is the possibility to either include types or exclude types; for this, @ComponentScan declares two annotation attributes: includeFilters to selectively include types and excludeFilters to remove types.
Because by default @ComponentScan includes all @Component types, you can disable automatic detection for includeFilters with an annotation attribute: useDefaultFilters = false. In that case, only what is included by the includeFilters will be used.
@ComponentScan.Filter
includeFilters and excludeFilters are of type @ComponentScan.Filter[]. The annotation type @Filter is nested in annotation type @ComponentScan. A filter contains additional information, for example, what kind of filter can be used. Filters can be constructed according to a whole range of criteria, for example:
- What is type-compatible?
- What fits on a regular expression (regex)?
- What annotations do the types have (default setting)?
In this example of the first filter type, the classpath scanner should be configured to detect only components of type Thumbnail:
@Configuration
@ComponentScan(
// basePackages = "com.tutego.date4u",
useDefaultFilters = false,
includeFilters = @ComponentScan.Filter(
type = FilterType.ASSIGNABLE_TYPE,
classes = Thumbnail.class )
)
class ThumbnailScanner { }
The annotation attribute basePackages could be set, but it doesn’t have to be because without specification, the starting package of the search is the package where ThumbnailScanner is located. If it should not be in com.tutego.date4u, and we want other starting packages, we set basePackages.
The assignment useDefaultFilters = false controls in my example that not every @Component component is automatically detected and logged in. FilterType.ASSIGNABLE_TYPE sets the actual criteria that all thumbnail implementations are found.
It’s useful to leave useDefaultFilters = true (this is the default) and still work with an includeFilters. The reason is that includeFilters also finds types that aren’t annotated with @Component and still registers them as a Spring-managed bean.
excludeFilters
Let’s formulate a second example with excludeFilters. We don’t want to include types that extend AwtBicubicThumbnail. useDefaultFilters remains true, so we can assume an entire list of all components.
@Configuration
@ComponentScan(
// basePackages = "com.tutego.date4u",
excludeFilters = @ComponentScan.Filter(
type = FilterType.ASSIGNABLE_TYPE,
classes = AwtBicubicThumbnail.class )
)
class ThumbnailScanner { }
Currently there is only one type in excludeFilters, but multiple types are possible in the array notation. The found types pass through this “filter,” and if they are instanceof AwtBicubicThumbnail, they aren’t included in the list.
Example for includeFilters with FilterType.ANNOTATION
The next example combines an includeFilters together with FilterType.ANNOTATION. Only types annotated with ThumbnailRenderingFast are recognized. All other classes should be ignored; therefore, useDefaultFilters = false:
@Configuration
@ComponentScan(
useDefaultFilters = false,
includeFilters = @ComponentScan.Filter(
// type = FilterType.ANNOTATION,
classes = { ThumbnailRenderingFast.class } )
)
class FastThumbnailScanner { }
If useDefaultFilters were true (the default), we would have many more types because includeFilters expands the search. Because filter type ANNOTATION is the default, the assignment isn’t necessary. With classes, the exact annotations are listed, which the found classes should have.
The code can be written a little more compactly because classes is an alias for value, and you can also omit the curly braces for an array with only one element. From ComponentScan. Filter, the filter can be imported statically with possible abbreviations as follows:
@Configuration
@ComponentScan(
useDefaultFilters = false,
includeFilters = @Filter( ThumbnailRenderingFast.class ) )
class FastThumbnailScanner { }
Example of [include|exclude]Filters with FilterType.REGEX
Let’s look at another example, using includeFilters and FilterType.REGEX for regex, along with excludeFilters. The following example is intended to find all types ending in “New” or “Old”, but ignore LegacyAwtThumbnailOld:
@Configuration
@ComponentScan(
useDefaultFilters = false,
includeFilters = @Filter(
type = FilterType.REGEX, pattern = ".*(New|Old)" ),
excludeFilters = @Filter(
type = FilterType.ASSIGNABLE_TYPE,
classes = LegacyAwtThumbnailOld.class )
)
class FastThumbnailScanner { }
With useDefaultFilters = false, there are no @Component components by default. includeFilters selects via type = FilterType.REGEX all type names that match ".*(New|Old)". This is the typical notation of Java regex. There are also Ant-style path pattern matchers in the Java universe; these aren’t used here, but instead classic regex according to the rules described by java.util.regex.Pattern. Next, we add an exclude-Filters with the ASSIGNABLE_TYPE. Of course, we could have worked with a Filter- Type.REGEX in the example with this same type name, but strings aren’t very robust when refactoring. If we can express something as a Class object, all the better.
FilterType.CUSTOM
If the mentioned filters can’t cover a scenario, a completely independent filter can be implemented. The first thing to do is to implement the TypeFilter interface, as briefly outlined here:
class MyTypeFilter implements TypeFilter {
@Override
public boolean match( MetadataReader metadataReader,
MetadataReaderFactory metadataReaderFactory ) {
ClassMetadata classMetadata = metadataReader.getClassMetadata();
…
}
}
2
The TypeFilter interface is a functional interface with a match(…) method. It must decide whether a type will later appear in the result list or not. For the method to make the decisions, the framework passes two pieces of information: MetadataReader and MetadataReaderFactory. With the types, the method can find out more about the type that was just scanned, or it can inquire something from all other components.
The custom type filter implementation is referenced later at @ComponentScan:
@Configuration
@ComponentScan(
useDefaultFilters = false,
includeFilters = @Filter(
type = FilterType.CUSTOM,
classes = MyTypeFilter.class )
)
class MyTypeFilterScanner { }
In this way, a filter can test arbitrary things, for example, whether a certain class contains certain methods or certain variables.
In this blog post, we’ve looked in detail at configuring classpath scanning. The rules can get confusing, and the recommendation is to keep it simple. It’s best to use only the startup packages for classpath scanning because this is the easiest to maintain.
Editor’s note: This post has been adapted from a section of the book Spring Boot 3 and Spring Framework 6 by Christian Ullenboom. Christian is an Oracle-certified Java programmer and has been a trainer and consultant for Java technologies and object-oriented analysis and design since 1997.
This post was originally published 5/2024.

.jpg?height=600&name=What%20Is%20a%20Spring%20Container%20(2).jpg)

Comments