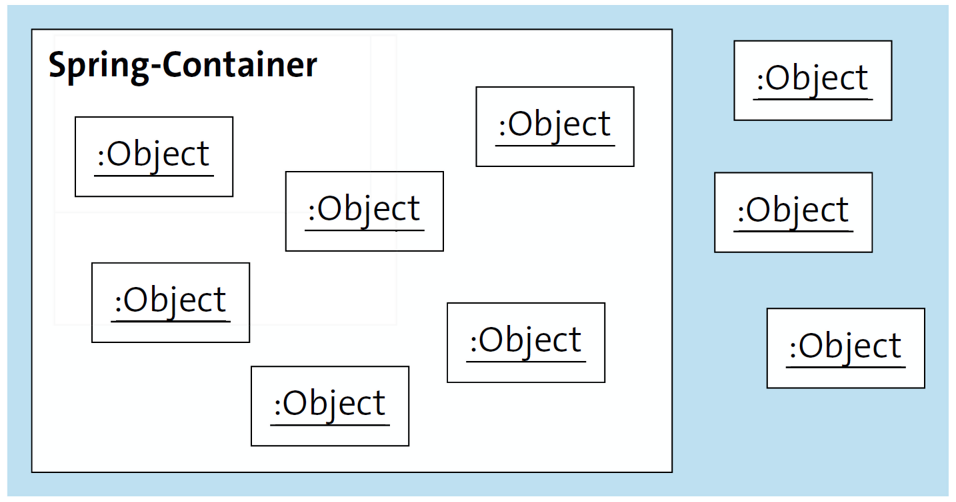
At the heart of a Spring application is a special data structure, the Spring container (container for short). The objects that this container manages are called Spring-managed beans or components.
The container has three central tasks:
- Create
- Manage the Spring-managed beans
- Configure and resolve dependencies between components
Components can later be taken out of the container and queried.
Not all objects are inside the Spring container, and there are still plenty of objects outside the container, such as strings or loaded rows from a database.
Start Container
The Initializr has generated a class called Date4uApplication with a main(…) method. In
the body of the main(…) method, there is a run(…)call, which starts up the container.
@SpringBootApplication
public class Date4uApplication {
public static void main( String[] args ) {
SpringApplication.run( Date4uApplication.class, args );
}
}
The run(…) method is a static method of the SpringApplication class. Two pieces of information are passed to the run(…) method: the initial configuration, which here is the type of your own class, and the actual parameters given to the main(…) method, which are passed to this run(…) method. Spring takes out certain configuration information from the arguments. If these arguments weren’t passed, Spring would not be able to get the arguments we pass on the command line.
Three things can happen when run(…) is called:
- If there is an error in the configuration, the container isn’t started and the program stops; run(…) ends with an exception.
- Everything is fine, the container initializes all components and is then finished, and the run(…) method is exited. However, a web server such as Tomcat could have been started, for example, and the program continues to run even though the main(…) method ended.
- The run(…) method may hang in an infinite loop because, for example, an interactive shell is started.
Besides the static run(…) method of the SpringApplication class, there are two other ways to start the container. These options are interesting because they allow us to configure the container right at the start.
Instantiate SpringApplication
The first alternative to the static run(…) method is to build an object of the SpringApplication type and later use the run(…) instance method. The advantage of this variant is that we can make some settings in the SpringApplication object:
SpringApplication app = new SpringApplication( Date4uApplication.class );
app.setHeadless( false );
app.setBannerMode( Banner.Mode.OFF );
app.setLogStartupInfo( false );
// More initializations
app.run( args );
2
The example shows three settings:
- By default, Spring applications run in headless mode, which means they have no graphical user interface (GUI) part. If Spring applications are to have a GUI, this would cause an exception in this mode because the AWT system is disabled. If you want to write GUI applications, you have to turn off the headless mode to get a head again (delightful, this double negation).
- The start banner is turned off. We’ve seen that a configuration property can turn off the banner. This is also possible in code with the setBannerMode(…) Enumeration constants such as Banner.Mode.OFF are passed so that the banner is no longer output at startup.
- Besides the banner, other startup information is output, including the profile. These outputs can be switched off with setLogStartupInfo(false).
If you look at the static run(…) method in implementation, it only builds a SpringApplication instance. The static run(…) method is just a facade—a shortcut for actually instantiating SpringApplication.
The container is started with the instance method run(…). The method is passed the command line arguments in the same way as the static method. The type information doesn’t have to be passed to the instance method run(…) because it has already been provided to the constructor of SpringApplication.
SpringApplicationBuilder *
The second variant is the use of class SpringApplicationBuilder, whose name hints at what it’s all about: building an object using the builder pattern.
Note: With the builder pattern, no parameterized constructors or setters are used for configuration, but methods are cascaded, that is, set one after the other. If methods of the type a().b().c() are set one after the other, this is also referred to as a Fluent API.
The builder pattern is popular to get to a final configuration via Fluent API over several steps. What we’ve just written can be written this way with the builder:
new SpringApplicationBuilder( Date4uApplication.class )
.headless( false )
.bannerMode( Banner.Mode.OFF )
.logStartupInfo( false )
.run( args );
The code looks much “airier” this way because where setters were used before, with SpringApplicationBuilder, these methods can be easily cascaded for setting.
The settings options of SpringApplication and the Spring ApplicationBuilder are almost identical. There are two small differences:
With SpringApplicationBuilder, you can only set the states; you can’t read them. That is, there are no getters. In SpringApplication, there are setters and getters, but the getters are rarely needed anyway.In SpringApplicationBuilder, hierarchical contexts can be set. In a hierarchical context, parents, children, and siblings can be modeled to have an isolated container, which can guarantee that, for example, there is no accidental access to the children from the parent component.
What main(…) Does and Doesn’t Do
Not much happens in the main(…) method in general, except that run(…) starts up the container. The reason is that in the main(…) method, we’re looking at this container with the Spring-managed beans from the outside, so to speak. However, the components of our application must themselves be part of the Spring container to be mutually connected.
That’s why it’s important to think about how to run your own program code in the context of the container. There are several possibilities.
The run(…) Method Returns ConfigurableApplicationContext
The run(…) method returns an application context (or context, for short). This can be stored in a variable and used later:
ConfigurableApplicationContext ctx =
SpringApplication.run( Date4uApplication.class, args );
ConfigurableApplicationContex is an interface that extends other interfaces; it’s a rather complex inheritance relationship, as the figure below shows.
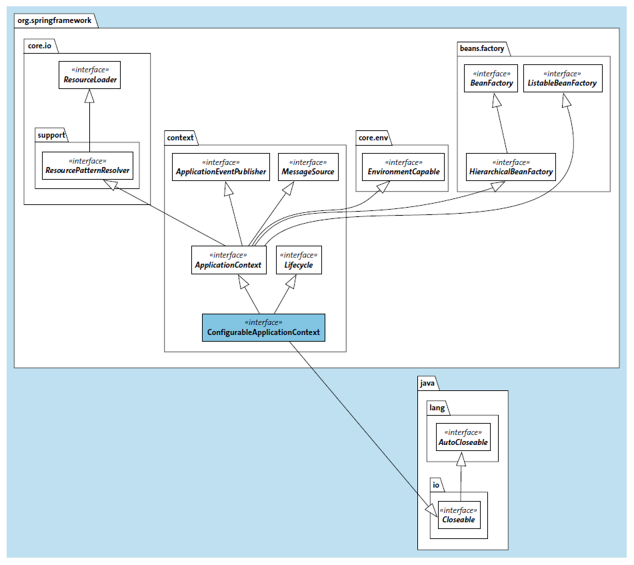
Fortunately, it’s not at all necessary to know all this, but from the type names, you can get the first clues:
- The Spring context is a BeanFactory that manages Spring-managed beans at its heart.
- MessageSource can include internationalized resource files.
- Resources can be loaded using the ResourceLoader.
- Events can be sent to and received from the container.
Context Methods
Interface ApplicationContext extends ListableBeanFactory, which declares method getBeanDefinitionNames(…) that returns a String[] with the names of the components that the container has registered.
Let’s use this method for a sorted listing of all registered components:
ApplicationContext ctx =
SpringApplication.run( Date4uApplication.class, args );
Arrays.stream( ctx.getBeanDefinitionNames() )
.sorted()
.forEach( System.out::println );
The fact that the return of run(…) is a ConfigurableApplicationContext isn’t needed in the example; the type name ApplicationContext is shorter and also extends ListableBeanFactory.
After starting the modified program, a sorted listing of all logged-in Spring-managed beans appears on the console, which are present without us having configured anything. The output of the approximately 50 Spring-managed beans includes the following:
- applicationAvailability
- applicationTaskExecutor
- date4uApplication
- forceAutoProxyCreatorToUseClassProxying
- lifecycleProcessor
- mbeanExporter
- mbeanServer
- objectNamingStrategy
- springframework.aop.config.internalAutoProxyCreator
- [ommmited for brevity]
- task.scheduling-org.springframework.boot.autoconfigure.task.TaskSchedulingProperties
- springApplicationAdminRegistrar
- sslBundleRegistry
- sslPropertiesSslBundleRegistrar
- taskExecutorBuilder
- taskSchedulerBuilder
That’s actually amazing because we didn’t do anything special and still get a number of components put in the container.
Spring Boot Auto-Configuration
This feature is the key difference between Spring Boot and Spring Framework. With Spring Framework, we have to configure everything—nothing happens by itself. With Spring Boot, on the other hand, components are automatically registered because an auto-configuration decides that it’s useful to build certain objects. An auto-configuration, and the name says it, automatically builds configurations and is the magic wand of Spring Boot.
It’s nice that there are about 40 components in the context, but currently it doesn’t matter for us; these are details we have nothing to do with. Of all the components, one should catch our eye, however: date4uApplication. Our own initial configuration was instantiated as an object and then placed in the container. Our component is automatically named; it’s lowercase and not capitalized like the class name.
Tip: Class BeanFactoryUtils provides additional methods, for example, to determine all the beans in packages.
Query Targeted Beans with Methods from BeanFactory
Interface ConfigurableApplicationContext extends ListableBeanFactory. Of type ListableBeanFactory, we’ve already used method getBeanDefinitionNames(). ListableBeanFactory itself extends BeanFactory. There we find methods for taking Spring-managed beans and for existence tests. Here’s a small method selection:
- boolean containsBean(String name)
- T getBean(Class<T> requiredType)
- Object getBean(String name)
- T getBean(String name, Class<T> requiredType)
With getBean(…), a bean name or a type token can be passed, which looks something like this:
ApplicationContext ctx =
SpringApplication.run( Date4uApplication.class, args );
MyBean bean = ctx.getBean( MyBean.class );
The return of the methods is the bean or an exception if the bean can’t be provided. All Spring-managed beans have a name (an ID), and also alternative names (called aliases) are possible. The beans can be queried by their name. Unlike the getBean(Class) method, getBean(String) doesn’t know what type is returned, and therefore the return type is only java.lang.Object. If the type is known, getBean(String, Class) returns that return type.
Editor’s note: This post has been adapted from a section of the book Spring Boot 3 and Spring Framework 6 by Christian Ullenboom. Christian is an Oracle-certified Java programmer and has been a trainer and consultant for Java technologies and object-oriented analysis and design since 1997.
This post was originally published 2/2024.


Comments