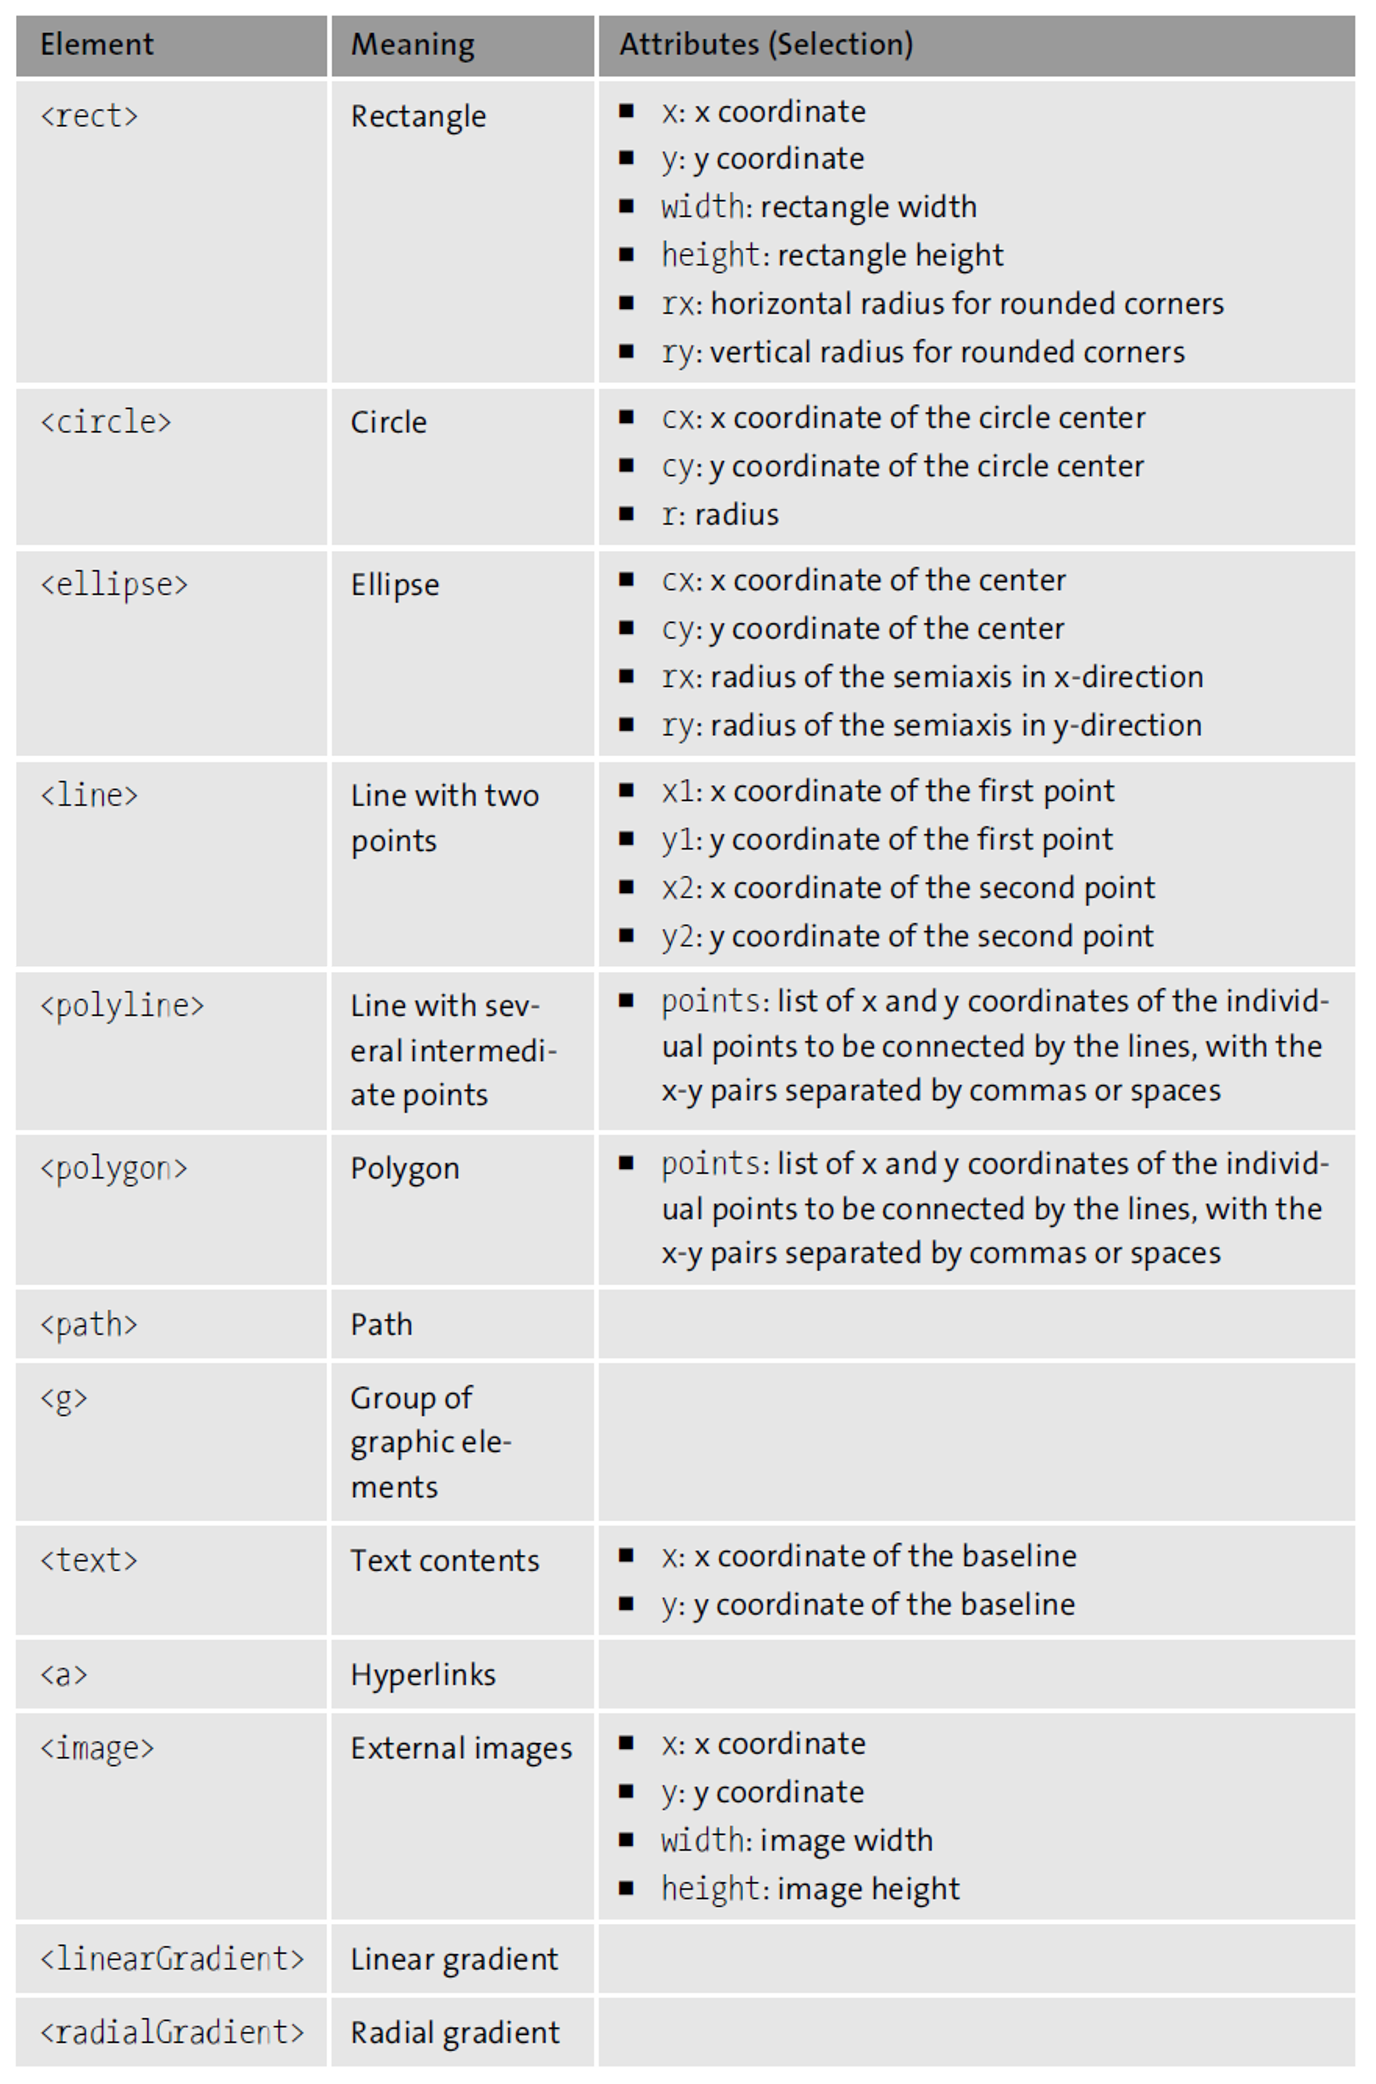
In addition to being able to draw pixel-based graphics via JavaScript using the Canvas API, you can also use JavaScript to create vector graphics.
One of the better-known formats, which has celebrated a comeback thanks to HTML5 in particular, is the SVG format. SVG is an XML-based markup language for describing two-dimensional vector graphics. For this purpose, the corresponding specification (www.w3.org/TR/SVG2/) provides various elements such as <circle>, <ellipse>, <line>, <polygon>, <polyline>, and <rect> to define geometric shapes.

You can create SVG graphics manually, but this is often quite tedious, especially when it comes to creating more complicated graphics. It’s easier to create appropriate graphics in one of the numerous vector programs available, export them to SVG format (programs like Adobe Illustrator, Inkscape, and similar others usually offer such an option), and then use them in the appropriate web page. You can see a simple example of an SVG document in below: a white circle on a black background.
<svg xmlns="http://www.w3.org/2000/svg">
<rect width="100%" height="100%" fill="#000000" />
<circle id="circle" cx="100" cy="100" r="80" fill="#ffffff" />
</svg>
Integrating SVG in HTML
To integrate SVG in HTML, you have several options, the most important ones of which are briefly described in the following sections.
Integrating Via the <img> Element
Here, the corresponding SVG file is simply linked via the src attribute of the <img> element (see below). Browsers that can handle SVG will then display the linked SVG document at the appropriate place in the HTML.
However, links defined within the SVG content are not supported by this type of integration. The same applies to JavaScript code that appears within the SVG document. This code won’t get interpreted or executed.
<!DOCTYPE html>
<html>
<head lang="en">
...
</head>
<body>
<img src="example.svg" alt="SVG-Grafik" width="500" height="500" >
</body>
</html>
Integrating Via the <iframe> Element
SVG files can also be defined as the source for the content of <iframe> elements (as shown below). The SVG file is then displayed within the iFrame. Unlike integrating via the <img> element, this type of integration interprets links within the SVG content and also executes any JavaScript that may exist.
<!DOCTYPE html>
<html>
<head lang="en">
...
</head>
<body>
<iframe src="example.svg" width="500" height="500" scrolling="no" >
<!-- For older browsers that don’t support SVG -->
<img src="example.tif" width="500" height="500" alt="Alternative PNG image">
</iframe>
</body>
</html>
Integrating Via the <object> Element
You can also integrate SVG files as multimedia objects using the <object> element (see below). For older browsers that can’t display SVG, you can also specify alternative content, such as an alternative image, between the opening and closing <object> tags.
Similar to integrating via the <iframe> element, this type of integration interprets links within the SVG content, and JavaScript is also supported.
<!DOCTYPE html>
<html>
<head lang="en">
...
</head>
<body>
<object data="example.svg" width="500" height="500" >
<!-- For older browsers that don’t support SVG -->
<img src="example.tif" width="500" height="500" alt="Alternative PNG image">
</object>
</body>
</html>
Integrating As Background Image Via CSS
SVG files can also be used (surrounded by url()) as a value for the background CSS property (as shown below). In this case, the content of the SVG file is used as the background image for the corresponding element (or elements) selected by the respective CSS rule. However, links within the SVG content and JavaScript code won’t be interpreted.
<!DOCTYPE html>
<html>
<head lang="en">
...
</head>
<body>
<div style="background: url(example.svg); width: 500px; height: 500px" ></div>
</body>
</html>
Inline Definition in HTML
A particularly convenient feature is the fact that SVG can also be defined directly "inline" within the HTML code (as shown in the next listing). The browser then interprets the SVG in place, so links and JavaScript are interpreted as well.
<!DOCTYPE html>
<html>
<head lang="en">
...
</head>
<body>
<svg id="svg" version="1.1"
baseProfile="full"
width="500" height="500"
xmlns="http://www.w3.org/2000/svg">
<rect width="100%" height="100%" />
<circle id="circle" cx="100" cy="100" r="80" />
</svg>
</body>
</html>
Changing the Appearance of SVG Elements with CSS
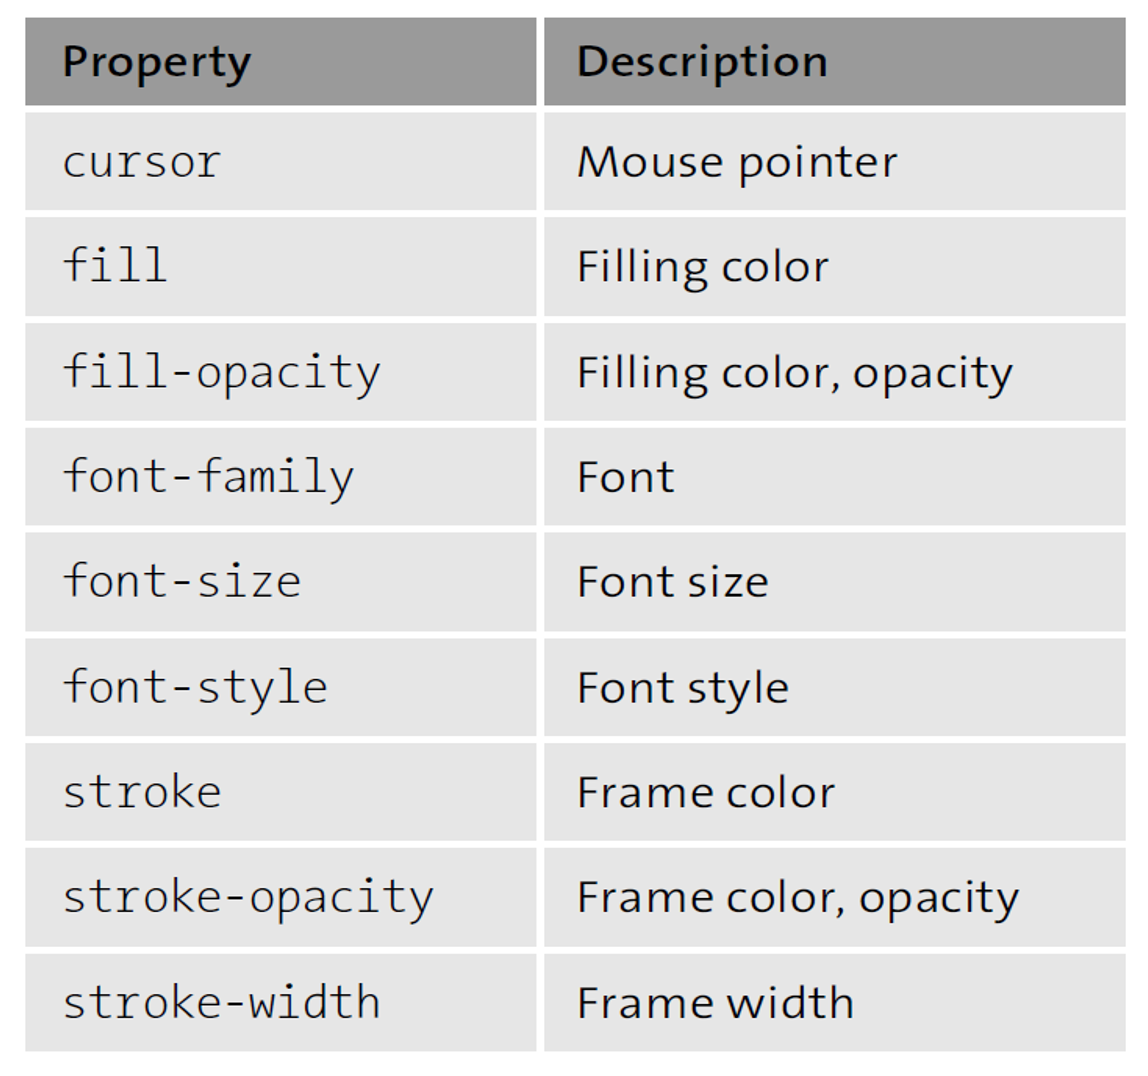
The individual elements within an SVG document can be styled using CSS, although the properties are not the same as those you use when styling HTML elements. For a selection of permitted elements, see the table below. You also can find a complete listing in the SVG specification at www.w3.org/TR/SVG2/styling.html.

Here is an example in which the SVG from above is styled using CSS.
rect {
stroke-width: 4;
fill: #FFFFFF;
stroke: #3080D0;
}
11
#circle:hover {
cursor: pointer;
}
#circle {
fill-opacity: 0.5;
stroke-width: 4;
fill: #3080D0;
stroke: #3080D0;
}
#circle.active {
fill: #000000;
}
text {
fill: #FFFFFF;
font-family: sans-serif;
}
Manipulating the Behavior of SVG Elements via JavaScript
Not only can you style the elements in an SVG document using CSS, you can also access individual elements using JavaScript, modify them, add new elements, and basically perform all the other DOM operations you already know about.
As an example of this, we'll describe two use cases: first, how to add event listeners to individual SVG elements using JavaScript, and second, how to dynamically change the position of a graphic element using JavaScript.
Registering an Event Listener for SVG Elements
The code example below contains an example of registering event listeners to SVG elements. Here the embedded <svg> element is first accessed via the getElementById() method and then the <circle> element is determined via a renewed call of this method (this time on the <svg> element found). After that, three different event listeners are registered via the addEventListener() method: the event listener for the click event is called when the <circle> element is clicked, and the event listeners for the mouseover and mouseout events are called whenever the mouse pointer is moved over or away from that element. In both cases, the active CSS class is switched back and forth, and thus the filling color is changed.
'use strict';
function init() {
const svgDocument = document.getElementById('svg');
const circle = svg.getElementById('circle');
circle.addEventListener('click', (e) => {
console.log('Hello World');
});
circle.addEventListener('mouseover', (e) => {
circle.classList.toggle('active');
});
circle.addEventListener('mouseout', (e) => {
circle.classList.toggle('active');
});
}
window.addEventListener('DOMContentLoaded', init);
Dynamically Changing SVG Elements
SVG elements can of course also be changed dynamically via JavaScript—for example, the position of the <circle> element. For this purpose, the HTML/SVG is first extended by two sliders, as shown here.
<!DOCTYPE html>
<html>
<head lang="en">
<meta charset="UTF-8">
<title>SVG example</title>
<link rel="stylesheet" href="styles/styles.css"></head>
<body>
<script src="scripts/main.js"></script>
<svg id="svg" version="1.1"
baseProfile="full"
width="500" height="500"
xmlns="http://www.w3.org/2000/svg">
<rect width="100%" height="100%" />
<circle id="circle" cx="100" cy="100" r="80" />
</svg>
<div>X: <input id="sliderX" type="range" min="1" max="500" value="100" /> </div>
<div>Y: <input id="sliderY" type="range" min="1" max="500" value="100" /> </div>
</body>
</html>
Then, an event listener for the change event is added to each slider (see below), within which the moveCircle() function is called. This function expects the following parameters: first, a position specification, and second, a specification about the direction (horizontal or vertical or x or y). Based on this, either the cx attribute (x coordinate of the circle center) or the cy attribute (y coordinate of the circle center) is updated accordingly. The circle then is immediately moved to the corresponding position on the drawing area.
'use strict';
function init() {
const sliderX = document.getElementById('sliderX');
const sliderY = document.getElementById('sliderY');
sliderX.addEventListener('change', (e) => {
moveCircle(e.target.value, 'x');
});
sliderY.addEventListener('change', (e) => {
moveCircle(e.target.value, 'y');
});
}
function moveCircle(value, direction) {
const svgDocument = document.getElementById('svg');
const circle = svgDocument.getElementById('circle');
circle.setAttribute('c' + direction, value);
}
window.addEventListener('DOMContentLoaded', init);
Editor’s note: This post has been adapted from a section of the book JavaScript: The Comprehensive Guide by Philip Ackermann. Philip is the CTO of Cedalo GmbH and the author of several reference books and technical articles on Java, JavaScript, and web development. His focus is on the design and development of Node.js projects in the areas of Industry 4.0 and Internet of Things.
This post was originally published 12/2022.


Comments