In your Node.js application, you probably not only want to run external programs, but more importantly, you want to swap out parts of the application logic into your own child processes.
Code fragments with very time-consuming processing are particularly well suited for such measures. With this approach, you follow the same approach that the developers have envisioned for the entire Node.js platform. Basically, this means that you swap out CPU-intensive functions to prevent the processing of your application from being blocked. Once the result of the function is available, your application continues to work with this result within a callback function.
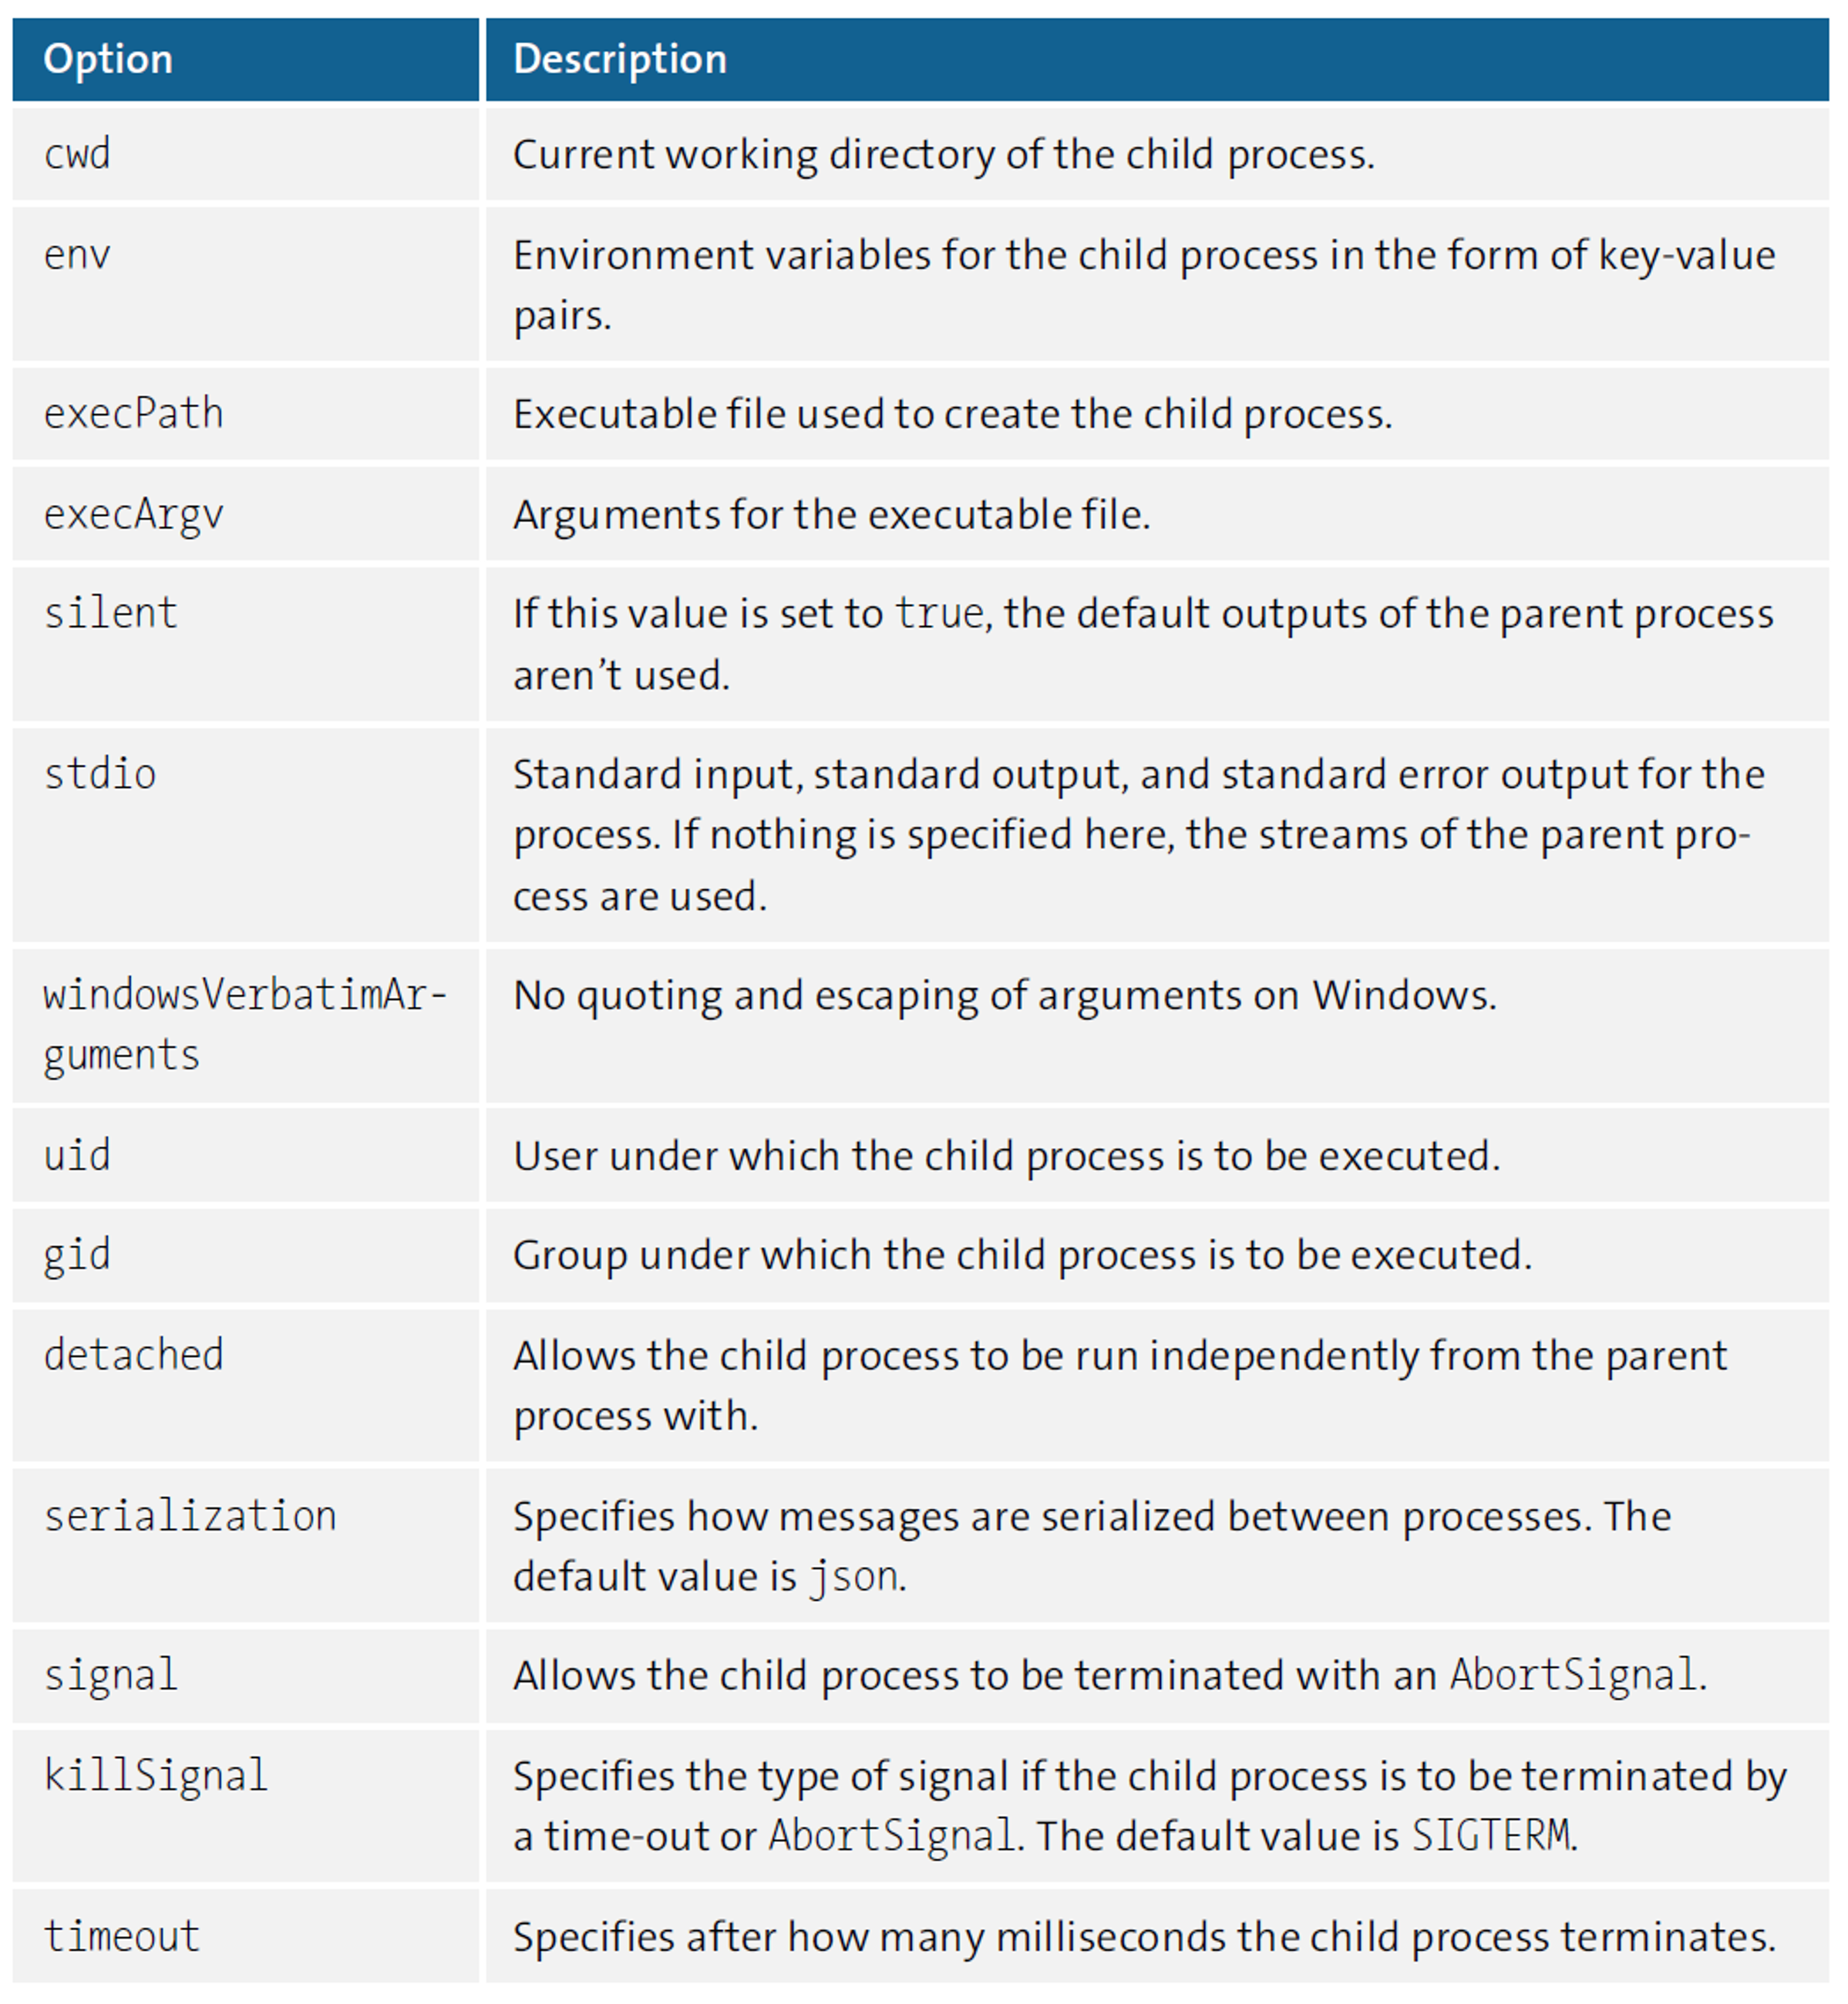
To allow you to swap out functionality from the main thread of your application, the Node.js platform provides the fork method from the child_process module. Calling the fork method is similar to calling the spawn and exec methods, where the first argument is the name of the module to be run. The module denotes the file containing the JavaScript source code that forms the basis of the child process. The second argument contains the values to be passed to the child process, and finally the third argument is a configuration object. In the configuration object, you have various options for affecting the behavior of the child process, as is the case with the other methods of the child_process module. The table below lists the available options you can use when processing the call.
16
The source code in this listing forms the basis for the further examples related to the fork method.
import { fork } from 'child_process';
if (process.argv[2] && process.argv[2] === 'child') {
console.log('Child Process');
} else {
console.log('Parent Process');
fork(process.argv[1], ['child']);
}
If you save the source code in a new file named index.js and execute it using the node index.js command, the output you’ll get is first the parent process and then the child process string. This type of application allows you to manage the source code of the parent process together with the code of the child process in a single file. You use both the ability to provide additional arguments to the child process via the fork method and the ability to access those arguments via process.argv. In this example, you pass an argument named child to the child process. Thus, you can now use the process.argv[2] property to check whether it exists and contains the child value, and thus determine whether you’re in the parent or child process when currently executing the source code. However, in a production environment, you should swap out the code blocks for the parent and the child process into separate files, as this supports the maintainability and readability of your application. In the sample code, you can also see another special characteristic: In the call of the fork method, you normally specify the name of the file to be executed in the child process as the first argument. In the example, you use the process.argv[1] property to specify the name of the current file, ensuring that the same file is loaded in the child process.
Calling fork causes a new Node.js process to be launched. The file specified as an argument in the call is loaded and interpreted as JavaScript code. Because every use of fork results in a new process being created, you shouldn’t create an unlimited number of child processes, as they also take up a considerable number of resources. Specifically, this affects mainly the memory and some processing power, depending on the operations you want to have performed.
So far, the example still makes relatively little sense because the child process has no logic, and both the parent and child processes don’t communicate with each other yet. Below shows how you can extend the code of this example to see the fork method in action.
import { fork } from 'child_process';
if (process.argv[2] && process.argv[2] === 'child') {
console.log('child');
let n = 1;
let results = 0;
outerLoop: while (results <= 1000) {
n += 1;
for (let i = 2; i <= Math.sqrt(n); i += 1) {
if (n % i === 0) {
continue outerLoop;
}
}
process.send({ prime: n });
results += 1;
}
process.exit();
} else {
const child1 = fork(process.argv[1], ['child']);
const child2 = fork(process.argv[1], ['child']);
const child3 = fork(process.argv[1], ['child']);
child1.on('message', (data) => {
console.log('child1: ' + data.prime);
});
child2.on('message', (data) => {
console.log('child2: ' + data.prime);
});
child3.on('message', (data) => {
console.log('child3: ' + data.prime);
});
}
This code makes sure that 1,000 prime numbers are calculated in each of three independent child processes and returned to the parent process, which is responsible for processing the output.
To achieve this result, in the first step, you start three child processes via three respective calls of the fork method, as you already know from earlier. The logic for the child process is located in the first part of the if statement. Here, a loop is used to check whether a number is a prime number. This process is run until the required total number of prime numbers has been found. The feedback to the parent process is done via the send method of the process object. The message to the parent process that you pass to this method as the first argument exists in the form of an object.
On the parent process side, you handle messages from the child processes by registering one callback function to the message event per instantiated child process. To help you distinguish which child process each prime number originates from, you should prefix an identifier to the output, such as child1 for the first child process.
However, communication isn’t limited to one-way communication from the child process to the parent process, as a transfer of data in the other direction is also possible. This listing shows how you can send messages from the parent process to the child process.
import { fork } from 'child_process';
if (process.argv[2] && process.argv[2] === 'child') {
process.on('message', (data) => {
console.log('in child process:', data);
});
process.send('ready');
} else {
const child = fork(process.argv[1], ['child']);
child.on('message', (data) => {
if (data === 'ready') {
for (let i = 0; i < 10; i += 1) {
child.send(i);
}
}
});
}
In this example, you can see that both processes can send messages back and forth equally. To do this, you first use the fork method in the else branch of the if statement to create the child process. In the child process, you register a message handler that writes the received data to the console. Then you send a message with the content ready to the parent process.
In the parent process, you first take care of creating the child process using the fork method and also register a message handler. Once the child process sends the ready message, the parent process starts sending the numbers from 0 to 9 in a loop to the child process, resulting in an output on the console as shown in this listing.
$ node index.js
in child process: 0
in child process: 1
in child process: 2
in child process: 3
in child process: 4
in child process: 5
in child process: 6
in child process: 7
in child process: 8
in child process: 9
To terminate the application, you must disconnect the parent and child processes. You can do this by calling the disconnect method of the child process in the parent process. The disconnect method cuts the connection between the two processes and makes the child process terminate if no more connections exist.
Editor’s note: This post has been adapted from a section of the book Node.js: The Comprehensive Guide by Sebastian Springer. Sebastian is a JavaScript engineer at MaibornWolff. In addition to developing and designing both client-side and server-side JavaScript applications, he focuses on imparting knowledge. As a lecturer for JavaScript, a speaker at numerous conferences, and an author, he inspires enthusiasm for professional development with JavaScript. Sebastian was previously a team leader at Mayflower GmbH, one of the premier web development agencies in Germany. He was responsible for project and team management, architecture, and customer care for companies such as Nintendo Europe, Siemens, and others.
This post was originally published 3/2024.


Comments