How can you defend yourself against physical attacks to a Windows or Linux machine? This blog post will discuss.
For one, the protective functions of EFI or BIOS: UEFI Secure Boot is always enabled on modern Windows computers anyway. You should block the ability to boot from an external drive and be sure to set a master password for EFI/BIOS. However, these measures do not constitute absolute protection. In particular, you can’t prevent a hacker from simply removing the hard drive or SSD and then accessing it.
BitLocker
The only effective protection against a hacker being able to read a device’s hard drive or SSD is to encrypt the disk entirely. Windows has integrated the BitLocker technology into the pro and enterprise versions of Windows for this purpose.
BitLocker normally requires that the computer contains a Trusted Platform Module (TPM). This is a chip that provides basic encryption functions according to a standard, uniquely identifies the device with a key, and provides memory for the secure storage of additional keys.
TPM can be implemented as a separate chip, but also as part of the CPU. Intel uses the— from a security point of view—highly controversial Intel Management Engine (ME) for some models and calls its TPM implementation Platform Trust Technology (PTT).
BitLocker stores the encryption key in the TPM chip. As long as Windows is booted directly from the device, accessing the BitLocker file system therefore succeeds without the annoying specification of a key. If, on the other hand, a hacker uses a different boot medium or removes the hard drive/SSD from the computer, access to the encrypted file system is only possible with the corresponding BitLocker password.
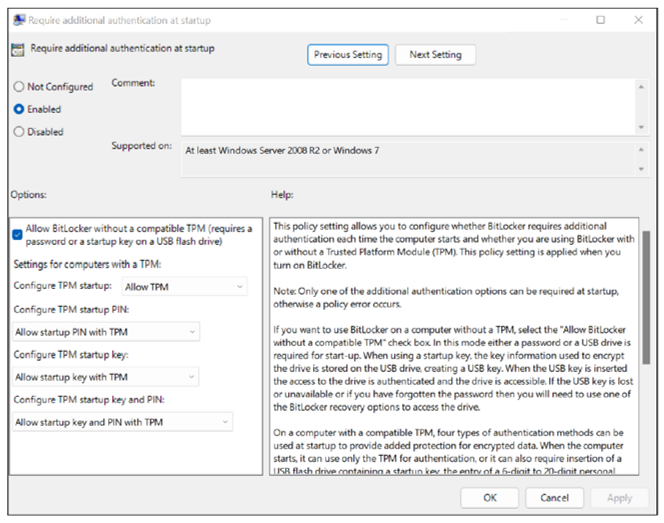
On older computers, you can use BitLocker without TPM. To do this, you must first modify a group policy. In the Local Group Policy Editor (gpedit for short), you need to search for the BitLocker options in the policies for the local computer.
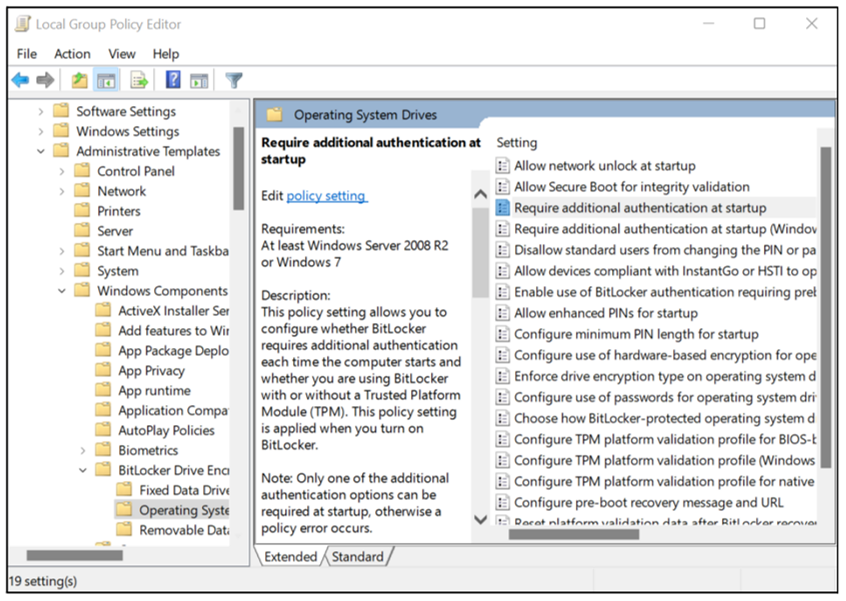
Now double-click Require additional authentication at startup to change the settings for the policy so that BitLocker also accepts a USB flash drive with a key file or the entry of a password instead of TPM for security.
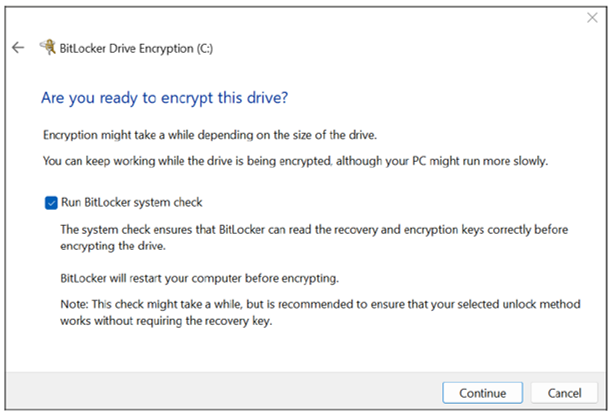
You can enable and disable BitLocker in the module of the same name in the Control Panel. In the dialogs that follow, you can then set a password, print or save the recovery key, choose between different encryption modes, and so on. The actual encryption takes place after the next Windows restart (see below). If you use BitLocker without TPM, a USB flash drive with the key file (*.BEK file) must be plugged into the computer. This USB flash drive will also allow booting without BitLocker password entry in the future.
While the file system is being encrypted, you can work normally. If you want to know how far the encryption has progressed, you should run the manage-bde command in cmd.exe or a PowerShell window with administrator privileges:
> manage-bde -status
...
Encrypted (percent): 32.7%
Encryption method: XTS-AES 128
External drives can also be encrypted via BitLocker to Go. This is especially important if backups are stored there; otherwise, an unencrypted backup will undermine BitLocker protection on the notebook.
Encrypting and decrypting files takes time. Fortunately, there is no significant speed disadvantage with modern notebooks because hardware encoders or decoders help the CPU with its work. The CPU functions are so efficient that the operation is only imperceptibly slower due to the encryption.
Modern data media themselves contain encryption functions that could relieve Windows or the CPU. In the past, however, their security has been repeatedly found to be inadequate. In current Windows versions, BitLocker therefore avoids the encryption functions provided by the disk and performs the encryption itself (see http://s-prs.co/v569640).
Access to BitLocker File Systems on Linux (dislocker)
If TPM is involved and you either know the password or have a key file, you can also access BitLocker file systems on Linux. You will need the dislocker package, which can also be installed in the live system:
apt install dislocker
dislocker-find determines the partitions on which BitLocker is used. With dislockermetadata, you can also find out which encryption method BitLocker uses:
dislocker-find
/dev/sda2
dislocker-metadata -V /dev/sdb2 | grep Type
... Encryption Type: AES-XTS-128 (0x8004)
To access the contents of the partition, you need to run dislocker-fuse. The command will ask you for the BitLocker password, without which access will not succeed:
mkdir /mnt/bitlocker
dislocker-fuse -V /dev/sdb2 -u /mnt/bitlocker/
Enter the user password: ************
If you have a *.BEK file with the BitLocker key, you can pass it with the -f option. dislocker- fuse will still ask for the password, but it’s now sufficient to simply press Enter:
dislocker-fuse -V /dev/sdb2 -u /mnt/bitlocker/ \
-f F622AE50-8C93-4847-8441-FAA184AFF9AD.BEK
Enter the user password: ************
However, in the /mnt/bitlocker directory mounted in this way, you will find only one file: dislocker-file. You can now use this file as an NTFS file system in a second step with mount:
ls -lh /mnt/bitlocker/
-rw-rw-rw- 1 root root 244G ... dislocker-file
mkdir /mnt/windows
mount -o ro /mnt/bitlocker/dislocker-file /mnt/windows/
ls /mnt/windows/
BOOTNXT hiberfil.sys ProgramData Programs swapfile.sys ...
As we pointed out in the introduction to this section: dislocker fails if the BitLocker key is located in TPM memory—which is true on most modern computers. You may have secured BitLocker with a password (PIN) in this case as well. However, this is only a code for accessing the key, not the key itself. Entering this code doesn’t help dislocker because the program doesn’t have access to the “correct” key in the TPM memory.
You can find more information on this at https://github.com/Aorimn/dislocker or http://s-prs.co/v569641.
BitLocker Security
BitLocker is considered secure according to current knowledge; that is, until mid-2022, there was no known way to break through the protection if the computer is turned off and the password isn’t known.
However, this only applies if the encryption is performed by Windows. If BitLocker relies on the encryption functions of the hard drive or SSD (which was quite common in the past), the security of the data depends on whether these encryption functions of the data carrier are implemented without errors. Unfortunately, a look back to the past shows that not much confidence is warranted in this regard. If necessary, you can use manage-bde -status to check which encryption method is present on your systems. If you see Encryption Method: Hardware Encryption, you should switch the encryption to Software Encryption. Unfortunately, this process is very time-consuming, because first all files have to be decrypted and then re-encrypted (see https://lifehacker.com/1830289471).
5
Naturally, encryption protection is highly dependent on the quality of the password. A password that is too short or too simple can be discovered by systematic trying. Another security risk is the storage of the key: during setup, the configuration program recommends printing a recovery key or saving it to a USB disk.
Microsoft claims that BitLocker doesn’t contain any backdoors. Because the source code of the software isn’t available, this statement can’t be proven. Police and intelligence agencies have repeatedly called for such a backdoor.
The Wikipedia page on BitLocker outlines the concept of a cold boot attack. It’s based on the fact that the BitLocker key is in memory while Windows is running: if a hacker steals the device while it’s running and reboots it within minutes with an own boot medium, it may be possible to read the key from memory.
Things get even easier if the attacker has access to the running, unlocked computer. Because the BitLocker password is located in the memory, the attacker only has to succeed in reading the entire RAM. The Passware company (https://www.passware.com) offers a corresponding attack kit for sale. It can read the working memory via the FireWire interface, if the computer provides such an interface.
BitLocker Alternatives
In the past, the TrueCrypt program, which is available in source code, was considered an alternative to BitLocker. However, the development of the program was discontinued in 2014. At the same time, warnings were issued about possible vulnerabilities contained in TrueCrypt. Various forks or variants of TrueCrypt, such as VeraCrypt or GhostCrypt, never achieved the same popularity as TrueCrypt—and were never checked to the same extent with regard to security issues.
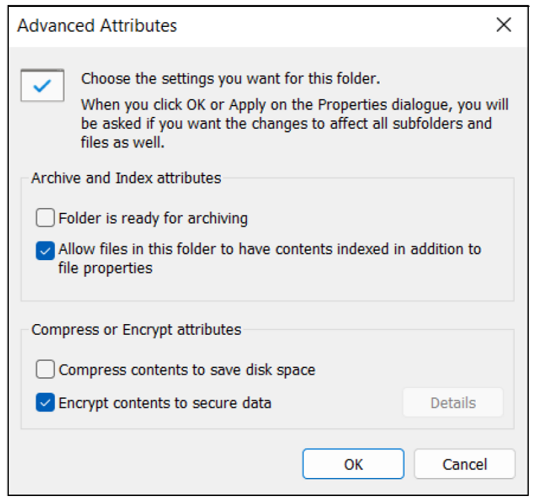
If you don’t want to encrypt the entire file system, but only individual files or directories, you can use the Encrypting File System (EFS). This relatively old Windows feature (it was first implemented in Windows 2000) is included only in selected versions of Windows, such as the pro, enterprise, and education versions.
To use EFS features, select the Properties context menu item of a file or directory, click the Advanced button, and then enable the Encrypt contents option (see figure below). Surprisingly, Windows doesn’t ask for an encryption password. Rather, Windows generates a key when the first EFS file is set up and secures access to that key with the current account data. Access to the files is thus linked to a successful Windows login. However, Windows recommends that you also back up the access key to an external disk and displays a corresponding dialog after encrypting.
If a hacker tries to view the files on Linux or from another Windows account, they’ll see the files, including the file names, but it isn’t possible to access them.
macOS: FileVault
macOS provides the FileVault encryption function, which is comparable to BitLocker. Encryption can be enabled either in the system settings (in the Security area) or via the sudo fdesetup enable command.
Current Macs use the T2 chip (Intel models) or functions of the M1/M2 CPU for encryption. On older Intel models without a T2 add-on chip, encryption is associated with the login password. So there is no separate password for encryption.
When setting up FileVault, macOS enables you to store the key in iCloud or in a local file. The key file provides a way to access data without the login password in an emergency case.
In terms of security, FileVault is comparable to BitLocker. The attacks outlined for Bit- Locker, such as reading the RAM, are basically also conceivable on macOS. However, the prerequisites for this are only given if the attacker already has access to the computer anyway.
T2 Vulnerability: Basically, Apple’s encryption method is considered mature and secure. However, the T2 chip has been found to have a serious security issue that can’t be fixed by updates (Checkm8). An attacker can gain unrestricted access to the computer via a manipulated USB-C cable. For more information, see https://ironpeak.be/blog/crouching-t2-hidden-danger.
5
Linux: Linux Unified Key Setup
There are several methods to encrypt a file system on Linux. The most popular is Linux Unified Key Setup (LUKS). It’s based on the dm_crypt kernel module, which extends the device mapper, which is responsible for accessing partitions or block devices in general, with cryptography functions. The module thus forms a logical layer between the encrypted raw data on the hard drive/SSD and in the file system as seen by the user. dm_crypt is often combined with LVM, but this isn’t mandatory.
Subsequent setup of LUKS is only possible with a very time-consuming and high administration effort. That’s why it is recommended to set up LUKS right at the time of its installation. All common Linux distributions provide corresponding options: on Ubuntu, you need to select Encrypt the new Ubuntu installation for security in the installer; on RHEL and CentOS, you must select Encrypt my data in the partitioning dialog. With both distributions, encryption already occurs at the LVM level. This way, all logical volumes are encrypted (i.e., all virtual partitions that will later contain file systems or swap space).
Unlike Windows, where the BitLocker key is stored in the TPM chip if possible, or macOS, where key access is secured with the login password, Linux always requires the LUKS password to be entered at the beginning of the boot process. An unattended restart isn’t possible without further ado. LUKS is thus well suited for notebooks, but not for servers running in a remote data center or in remote basements.
Security Concerns Regarding LUKS
Linux is more secure than Windows, it’s often said. Depending on the application, that may be true, but definitely not as far as SSD/hard drive encryption on desktop systems is concerned. The problem is not LUKS itself; the encryption as such is considered secure. The problem is rather the environment.
On macOS and Windows 11, it’s common to store the key via TPM and secure it via the normal login password. On Linux, on the other hand, two separate passwords are required, which is extremely impractical, especially if a computer is used by several people. Furthermore, it’s much more difficult to intervene in the boot process on macOS and Windows than it is on Linux.
For this reason, two attack paths are conceivable in Linux that would not work in the same way with a current macOS or Windows installation:
- In the first case, the attacker manipulates the boot process in such a way that the user thinks he or she is entering the decryption password. However, this password is actually tapped and can subsequently be used by the attacker to decrypt the data.
- In the second case, the attacker temporarily removes the SSD, copies the encrypted data, and reinstalls the device. Afterward, the attacker can try to guess the password at his leisure in a brute force attack. (Only a long password can prevent this.) On macOS or Windows 11, this attack path is impossible because the key is located in the notebook itself (in the TPM chip or in the CPU). The SSD can’t be read from the notebook under any circumstances.
Both hacking variants are admittedly complex and require physical access to the notebook. Nevertheless, the following applies: recent versions of Android, iOS, macOS, and Windows do a better job. Linux developer Lennart Poettering wants Linux to be just as secure. He has described in detail the underlying problems and a conceivable approach to solving them (which, however, will probably take years to implement. See http://sprs.co/v569642 and http://s-prs.co/v569643).
File System Encryption on the Server
It should be clear to you that the file systems of company notebooks should always be encrypted—regardless of whether the devices use Windows, macOS, or Linux as their operating system.
But what’s the recommendation for servers? The answer depends on several factors. The first question is where the servers are located. If they’re in locked rooms to which only a few people have access, there’s often no need for encryption at all. If, on the other hand, the server of a small company is located in a room to which everyone has access, encryption is very much appropriate.
Another factor is the operating system: Windows servers with TPM can be restarted without much additional effort even if encryption is enabled. Linux servers, on the other hand, require the manual entry of the LUKS password each time they are restarted. For this purpose, an administrator must have physical access to the computer. For servers that are usually administrated through the network (e.g., with SSH), this is extremely inconvenient. For root servers running in an external data center, the approach is simply impossible.
NAS devices represent a special case: with many devices, a hard drive can be removed with a flick of the wrist. So, for example, if an attacker comes to a company as a visitor and sees an unattended NAS device, they can steal a hard drive in no time.
With common NAS operating systems, you usually can’t encrypt the system as a whole, but you can encrypt individual directories. However, this makes handling more cumbersome. After a reboot—for example, after an update—the encrypted directories must be explicitly “opened” via the web interface of the NAS device by specifying the password. Until that happens, the directories aren’t available on the corporate network. As is so often the case, the question arises as to where the right compromise lies between high security and sufficient convenience.
Editor’s note: This post has been adapted from a section of the book Hacking and Security:
The Comprehensive Guide to Penetration Testing and Cybersecurity by Michael Kofler, Klaus Gebeshuber, Peter Kloep, Frank Neugebauer, André Zingsheim, Thomas Hackner, Markus Widl, Roland Aigner, Stefan Kania, Tobias Scheible, and Matthias Wübbeling.


Comments