When you implement components in React, situations can occur in which you have to intervene in the component's lifecycle at different points in time.
Typical examples include the creation of the component in the constructor, the update of props or states, or the unmounting of the component. Although the stations in the lifecycle of a class component are the same as in a function component, with class components, you have more intervention options. shows a graphical representation of the different lifecycle hooks available to you.
The lifecycle of a class component is divided into different sections:
- In the first section—the mounting section—the component is created and mounted in the application so that it becomes visible.
- The updating section describes the time during which the component is visible and users can interact with it. The main events that occur here are the changes from outside the component to the props and inside a component to the state.
- The last section is the unmounting section, which is triggered when the component is removed. This section is mainly about tidying up.
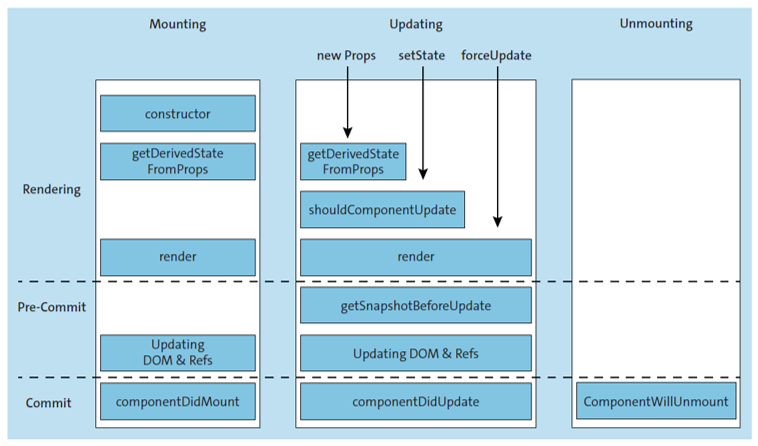
Different hooks are available in each section. These are methods that you implement and that are executed as soon as the component is in the respective section. Each section is in turn divided into up to three different phases. The phases have different characteristics when it comes to accessing the component and creating side effects as well as accessing the DOM:
- The render phase is responsible for rendering the component. The execution of the render method marks the end of this phase. This phase has no relevance for the unmounting section. The methods of this phase must not have any side effects because they can be stopped, aborted, and restarted by React.
- In the precommit phase, you can access the DOM of the component in read-only mode. This phase exists only in the updating section of the component lifecycle.
- The final phase of a component's lifecycle is the commit It exists in every section and allows you to access the DOM. In addition, side effects, such as communication with a server, can be performed and updates can be scheduled.
To demonstrate the different lifecycle hooks, you can implement a timer component that counts up time using the different lifecycle hooks. For this example, assume that you have a newly created React application that consists of two components, App and Timer:
import React from 'react';
import './App.css';
import Timer from './Timer';
class App extends React.Component {
state = {
time: 0,
};
handleClick() {
this.setState({ time: Math.floor(Math.random() * 10) });
}
render() {
return (
<div className="App">
<Timer time={this.state.time} />
<button onClick={() => this.handleClick()}>set</button>
</div>
);
}
}
export default App;
5
As you can see, the App component has its own state, which contains the number time. This is passed to the timer component in the render method via the time prop. There’s also a button that can reset the value through its click handler. Here, keep in mind that you lose the context inside an event-handler function. So if you were to pass the handleClick method directly to the onClick prop, the this inside the method would no longer point to the component instance. For this reason, you wrap the function call in an arrow function, which ensures that you keep the context.
Constructor
You use the constructor to perform the initialization of the component. As you already know, the constructor receives the passed props as an argument. Before you can use this in the constructor, you must call the parent constructor via the props object. Within the constructor, you can access the state via the state property and set it directly at this point without using the setState method:
import React from 'react';
export default class Timer extends React.Component {
constructor(props) {
console.log('Constructor');
super(props);
this.state = {
time: 0,
};
}
}
You first write to the console the information that the constructor has been called. Finally, you set the time property of the state object to its initial value of 0.
“getDerivedStateFromProps”
The static getDerivedStateFromProps method is called on each change. This method replaces the componentWillReceiveProps method and is rarely used. The method is used to determine if the props have changed and if the state needs to be adjusted. In the getDerivedStateFromProps method, you have access to the props and the state object. The method returns a new state object or null if the state remains unchanged.
import React from 'react';
export default class Timer extends React.Component {
constructor(props) {
console.log('Constructor');
super(props);
this.state = {
initial: 0,
time: 0,
};
}
static getDerivedStateFromProps(props, state) {
console.log('getDerivedStateFromProps');
if (props.time !== state.initial) {
return {
initial: props.time,
time: props.time,
};
}
return null;
}
}
In the example above, you add the initial property to the state. You use this property to check if the props have changed. In the getDerivedStateFromProps method, you first output the information that the function was called. If the props have changed, you set the time and initial values to the passed value.
“render”
If you don’t implement the render method, React cannot display the component. This component must return a JSX structure, which is then rendered by React.
import React from 'react';
export default class Timer extends React.Component {
constructor(props) {…}
static getDerivedStateFromProps(props, state) {…}
render() {
console.log('render');
return <div>{this.state.time}</div>;
}
}
The last step in the mounting section involves the componentDidMount method.
“componentDidMount”
With the methods used so far, you shouldn’t trigger any side effects yet as they can be aborted by React, which in turn can cause inconsistencies. You can trigger side effects using the componentDidMount method. Typically, these consist of asynchronous requests to a server or, as in our current example, setting an interval:
import React from 'react';
export default class Timer extends React.Component {
interval = null;
constructor(props) {…}
static getDerivedStateFromProps(props, state) {…}
render() {…}
componentDidMount() {
console.log('componentDidMount');
this.interval = setInterval(
() => this.setState(state => ({ time: state.time + 1 })),
1000,
);
}
}
You output the information about the execution of the method on the console again. Then you create an interval that increments the time value of the state by one every second. After you start your application on the console, switch to the browser. There you should see a result like the one shown here.
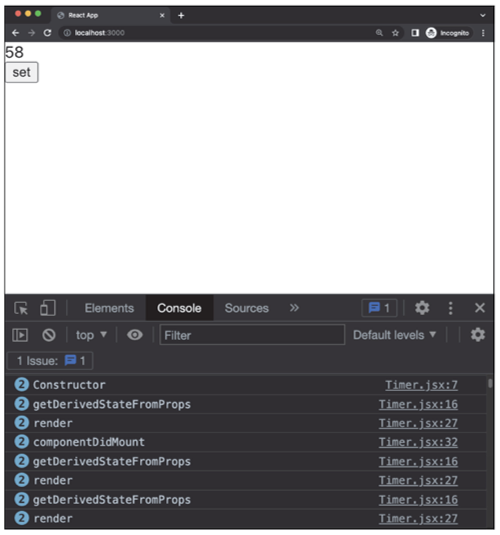
Once the componentDidMount method has been run, the component moves on directly to the updating section of its lifecycle. The getDerivedStateFromProps and render methods will continue to be executed on every update. These updates are caused by the setState calls in the componentDidMount method.
“shouldComponentUpdate”
You can use the shouldComponentUpdate method to specify whether the component should be redrawn after a setState call. If this method returns false, the render method won’t be executed. The default value true ensures that the component will be displayed anew. As arguments, you get access to the current props and the new state. In the example, you make sure that only time entries with an even value are displayed:
export default class Timer extends React.Component {
interval = null;
constructor(props) {…}
static getDerivedStateFromProps(props, state) {…}
render() {… }
componentDidMount() {…}
shouldComponentUpdate(newProps, newState) {
console.log('shouldComponentUpdate');
return newState.time % 2 === 0;
}
}
When you return to the browser after this change, you’ll see in the console that the render method is only executed on every other setState. The getDerivedStateFromProps and shouldComponentUpdate methods are still called every second.
“getSnapshotBeforeUpdate”
The getSnapshotBeforeUpdate method enables you to implement a hook that is executed after the render method has been run and before the changes are displayed. In this method, you have access to the previous state and props. The return value of this method must be either null or a value. This is then available in the componentDidUpdate method. The getSnapshotBeforeUpdate method isn’t executed if the shouldComponentUpdate method returns false.
export default class Timer extends React.Component {
interval = null;
constructor(props) {…}
static getDerivedStateFromProps(props, state) {…}
render() {…}
componentDidMount() {…}
shouldComponentUpdate(newProps, newState) {…}
getSnapshotBeforeUpdate(oldProps, oldState) {
console.log('getSnapshotBeforeUpdate');
return Date.now();
}
}
You merely generate the current timestamp and return it. You can then access this value in the componentDidUpdate method. This also marks the end of an updating section.
“componentDidUpdate”
In the componentDidUpdate method, as in the componentDidMount method, you can place side effects. The values of the previous props and the previous state are available as arguments in this method. You can use them to find out if certain values have changed in the current updating section. For this purpose, you can access the current values of the props and the state, respectively, via the props and state properties:
export default class Timer extends React.Component {
interval = null;
constructor(props) {…}
static getDerivedStateFromProps(props, state) {…}
render() {…}
componentDidMount() {…}
shouldComponentUpdate(newProps, newState) {…}
getSnapshotBeforeUpdate(oldProps, oldState) {…}
componentDidUpdate(oldProps, oldState, snapshot) {
console.log('componentDidUpdate');
if (oldState.initial !== this.state.initial) {
console.log(`${snapshot}: Time was reset`);
}
}
}
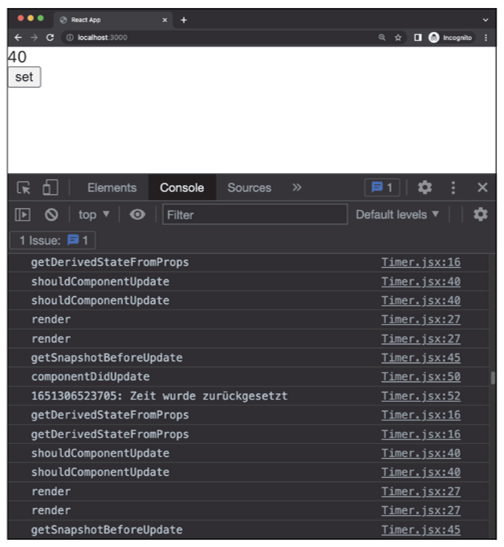
The code listing above shows a concrete example of the componentDidUpdate method. Here you check if the initial property of the state has changed. If that’s the case—that is, the button has been clicked on—then the browser console will show that the time has been reset. It also outputs the timestamp you created earlier in the getSnapshotBeforeUpdate method.
The figure below shows the console output during the updating section—in this case, also with the output after the users have clicked on the button.
The last stage of a component's lifecycle is initiated when the component is removed.
“componentWillUnmount”
A component can be removed by using conditional rendering, which allows you to display a component only under certain conditions. If the condition is no longer true, the component is removed. However, if you allocate resources within a component, you must ensure that these resources will be released again when you unmount the component. A classic example of such a resource is an interval, like the one you start in the timer component. This kind of cleanup work is carried out by the componentWillUnmount method.
The componentWillUnmount method is called directly before removing a component and receives no arguments. Inside the method, you shouldn’t call the setState method again because the component won’t be rendered again after the execution of the componentWillUnmount method.
To demonstrate the componentWillUnmount method, you can add an additional button in the App component that alternately sets the show property of the component state to true or false. You should set the default value of this property to true in the component. Depending on the value of the show property, you show or hide the timer component. You can achieve this, for example, by using the && operator, as shown here.
class App extends Component {
state = {
time: 0,
show: true,
};
getClickHandler() {…}
handleToggleShow() {
this.setState((state) => ({ ...state, show: !state.show }));
}
render() {
return (
<div className="App">
{this.state.show && <Timer time={this.state.time} />}
<button onClick={() => this.handleClick()}>set</button>
<button onClick={() => this.handleToggleShow()}>toggle</button>
</div>
);
}
}
In the timer component, you implement the componentWillUnmount method and use the clearInterval function to end the interval. You can see the required source code in this listing.
export default class Timer extends React.Component {
interval = null;
constructor(props) {…}
static getDerivedStateFromProps(props, state) {…}
render() {…}
componentDidMount() {…}
shouldComponentUpdate(newProps, newState) {…}
getSnapshotBeforeUpdate(oldProps, oldState) {…}
componentDidUpdate(oldProps, oldState, snapshot) {…}
componentWillUnmount() {
console.log('componentWillUnmount');
clearInterval(this.interval);
}
}
Unsafe Hooks
The hook methods presented here have been available in this form only since version 16.3. Prior to that release, there were other methods that are now marked as deprecated and will be removed in future releases. With the deprecated methods, some new features cannot be implemented—such as asynchronous rendering, for example. For this reason, the new lifecycle was introduced.
The methods that will be removed are as follows:
- componentWillMount: This method is executed in the mounting section before the render
- componentWillReceiveProps: The componentWillReceiveProps method is called before the props are updated. The argument provides access to the new props.
- componentWillUpdate: This method is executed once the props and state have been updated and before the component is rendered.
These lifecycle methods are given the prefix UNSAFE_ to indicate that problems may occur when they are used. The existing components can be automatically updated using the rename-unsafe-lifecycles codemod. For more information on this and other codemods, visit https://github.com/reactjs/react-codemod.
The different lifecycle methods are used in React applications. A typical example is communication with a server to load the data for display.
Editor’s note: This post has been adapted from a section of the book React: The Comprehensive Guide by Sebastian Springer. Sebastian is a JavaScript engineer at MaibornWolff. In addition to developing and designing both client-side and server-side JavaScript applications, he focuses on imparting knowledge. As a lecturer for JavaScript, a speaker at numerous conferences, and an author, he inspires enthusiasm for professional development with JavaScript. Sebastian was previously a team leader at Mayflower GmbH, one of the premier web development agencies in Germany. He was responsible for project and team management, architecture, and customer care for companies such as Nintendo Europe, Siemens, and others.
This post was originally published 11/2023.


Comments