In this blog post, we’ll show you how you can implement two-factor authentication for SSH on a Linux system.
The second factor is a one-time code that you generate with the free Google Authenticator iOS or Android app or an app compatible with it. These apps generate a new six-digit random number every 30 seconds that applies only to a specific host entry previously set up in the app.
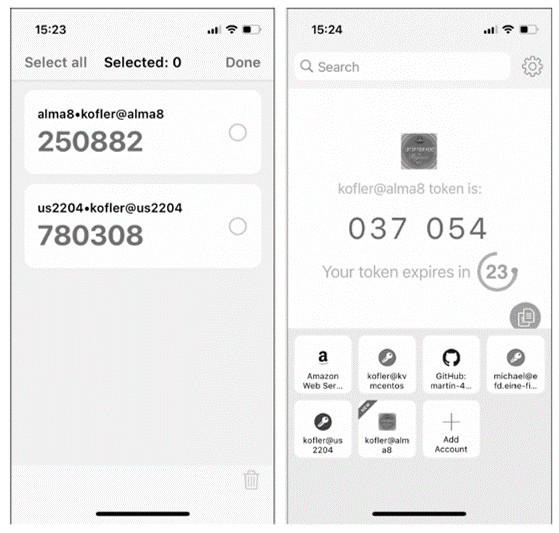
The numeric code is valid only once during a period of 90 seconds (to compensate for small time differences between the client and server) and only for a specific combination of username and hostname.
The Google Authenticator app (see https://en.wikipedia.org/wiki/Google_Authenticator) works purely locally. Neither the key nor the QR code required during setup nor the constantly generated one-time codes are transferred to a Google server or anywhere else. The app implements the publicly standardized HMAC-based one-time password algorithm (OATH-HOTP).
However, the security of the second authentication source is entirely dependent on the setup of the account entries. The QR code generated in the process must not fall into the hands of strangers. In addition, of course, the smartphone itself becomes a weak point if it is lost or stolen.
Using the Authenticator app is pretty straightforward. However, in our tests, the server-side configuration proved to be error-prone. If something goes wrong with the 2FA configuration, there’s a risk that you’ll no longer be able to log onto your own server via SSH. For this reason, our recommendation is to first perform a round of dry runs and test the configuration process in a virtual machine or on a locally accessible server.
Using Google Authenticator requires that the time on the client and on the server be in sync. You should pay particular attention to this when testing in virtual machines, where this condition is sometimes not met (e.g., when the virtual machine has been paused). Set the time again afterward or restart the virtual machine!
Setting Up Google Authenticator
First, you need to install the appropriate package depending on the distribution:
root# dnf install google-authenticator yrencode.x86_64 (RHEL 8/9 +
EPEL)
root# apt install libpam-google-authenticator (Ubuntu)
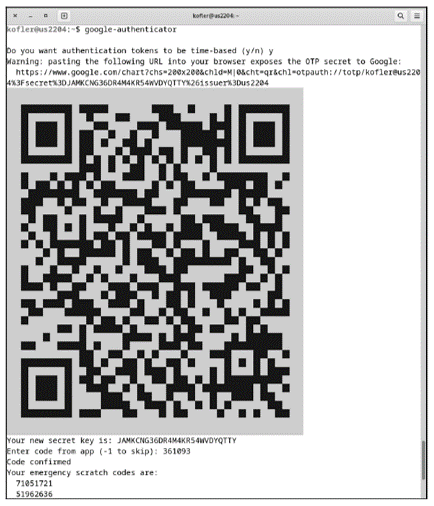
Then you should run the google-authenticator program for the user you want to log in as later via SSH (i.e., not for root):
user$ google-authenticator
Do you want authentication tokens to be time-based (y/n)
Do you want me to update your .google_authenticator file? (y/n)
Do you want to disallow multiple uses of the same
authentication token? (y/n)
...
You can answer all queries with y. The queries are omitted if you execute the command with the -t -d -f -r 3 -R 30 -W options. The program sets up the .google-authenticator file in the home directory and displays a QR code in the terminal (see below). You can photograph this code with the Google Authenticator app to add the account to the list of computers.
Note that each account is valid only for a combination of hostname and user! So if you run google-authenticator as user as34, for example, you can’t use the codes generated in the authenticator app to log in on the same machine as bf72 or as root!
2FA with Password and One-Time Code
Now the configuration of the SSH server is still pending. In this context, several options can occur: here, we start with the simplest variant, where the authentication is done via the account password (first factor) and the authenticator code (second factor).
The next listing shows the required settings in sshd_config. With UsePam and the keyboard- interactive method, PAM is used for authentication, and multilevel communication is also allowed. The UsePAM yes setting, which is also required, applies by default to almost all Linux distributions:
# File /etc/ssh/sshd_config
...
UsePAM yes
PasswordAuthentication no
ChallengeResponseAuthentication yes
AuthenticationMethods keyboard-interactive
Instead of setting up the authentication method globally, you can do it for selected users only. The instructions after Match User <name> apply only to the named user, in deviation from the default settings made previously (though some parameters, like UsePam and PasswordAuthentication, can only be set globally):
# File /etc/ssh/sshd_config
...
Match User kofler
AuthenticationMethods keyboard-interactive
The second part of the configuration is done in /etc/pam.d/sshd. At the end of this file, add a line that requires successful authentication by the Google Authenticator module in addition to all other rules—that is, in addition to correctly specifying the account password:
# at the end of /etc/pam.d/sshd (Ubuntu)
...
# Authenticator digit code is mandatory
auth required pam_google_authenticator.so
If you use RHEL or a clone, the PAM configuration must look slightly different. SELinux forbids the SSH server to access files outside the .ssh directory. Consequently, the new line in /etc/pam.d/sshd must look as follows (the entire statement must be written in one line without the \ character!):
14
# at the end of /etc/pam.d/sshd (RHEL 8 & co.)
...
# Authenticator digit code is mandatory
auth required pam_google_authenticator.so auth \
secret=/home/${USER}/.ssh/.google_authenticator
You also need to move the .google-authenticator file from the home directory to the .ssh subdirectory (here for user kofler):
kofler$ mv .google-authenticator .ssh/ (only inter RHEL!)
Don’t forget to activate the changes via systemctl reload sshd!
A possible variant is to add the nullok keyword at the end of the auth required line. This causes the line to be applied only if Google Authenticator has been set up for the account in question in the first place—that is, if the .google_authenticator file exists in the home directory:
# at the end of /etc/pam.d/sshd
...
# Authenticator digit code only required if the
# home directory contains the .google_authenticator file.
auth required pam_google_authenticator.so nullok
On the one hand, this has the advantage that in an emergency (smartphone lost/misplaced, for example) a login is also possible via an emergency account in which Google Authenticator was deliberately not set up. On the other hand, this variant weakens the protection provided by 2FA. If a new account is created on the computer, it’s easy to forget about setting up Google Authenticator.
Forcing a Google Authenticator Configuration: With some manual work, you can modify the .bash_login file in /etc/skel so that the script tests whether .google_authenticator exists. If that isn’t the case, googleauthenticator is run and the QR code for the Authenticator app is displayed. This will force Google Authenticator to be set up the first time you log in.
What Happens if the Smartphone Is Lost?
If the smartphone and thus the second authentication source is lost, the googleauthenticator command displays five strings that consist of digits when executed, which you can use once for a login. You need to write these codes down and keep them in a safe place so that you have a plan B in case of emergency. (The codes are also contained in the .google_authenticator file, but of course you can’t access this file if you’re no longer able to log on.)
Authy as an Alternative to the Google Authenticator App
Unfortunately, the Google Authenticator app doesn’t provide for the possibility of creating a backup of all accounts that have been set up. Transferring the accounts to another smartphone is also impossible. (If you still have your old smartphone, you should disable 2FA for each account, then reenable it with the new smartphone. If you administrate many accounts with 2FA, this process is extremely tedious and time consuming!) Current versions of the app are also annoying, with ads that can only be turned off with a paid upgrade.
An exciting alternative is the free Authy app (https://authy.com). It generates the same codes as the Google Authenticator app and also provides a lot of practical additional features, including synchronization of the 2FA accounts set up across multiple devices. The account data must be stored on the Twilio company server for this purpose. The data is encrypted with a password you choose, but there is no way to control how secure the process is and whether or not it gives Authy operators access to your data.
So the question is whether you trust Authy or the company behind it, Twilio. Founded in 2007, the business model of the company focuses on the sale or integration of authentication solutions. As far as internet reports can be trusted, the company is reputable. It collaborates with Dell, Microsoft and VMware, among others. Nevertheless, the price they pay for the comfort offered by Authy is reduced security, although it’s impossible to estimate how great the loss of security actually is.
On the other hand, it also seems risky to us to link the second factor exclusively with a short-lived smartphone. Authy’s decentralized approach is reassuring in this regard and has proven itself in our daily lives.
To learn more about Linux in general, check out the comprehensive guide here.
Editor’s note: This post has been adapted from a section of the book Hacking and Security: The Comprehensive Guide to Penetration Testing and Cybersecurity by Michael Kofler, Klaus Gebeshuber, Peter Kloep, Frank Neugebauer, André Zingsheim, Thomas Hackner, Markus Widl, Roland Aigner, Stefan Kania, Tobias Scheible, and aMatthias Wübbeling.


Comments