Imagine you want to learn Python (or any other language). Over the course of a few weeks, you try out new functions and create various small sample programs.
And as always when learning something new, you make a lot of mistakes. Suddenly, an example that was already working no longer runs.
Now, you see why you should put your sample programs under version control and sync them with GitHub. Doing so will allow you to reconstruct all the changes you’ve made over time. At the same time, you’ll now have an external backup.
Preparation Tasks
We assume that you already have git installed. In a terminal or cmd.exe, you need to run two commands so that Git knows your name and email address. This data is stored in each commit. (You don’t have to provide real data now if you don’t want to.)
git config --global user.name "Henry Hollow"
git config --global user.email "hollow@my-company.com"
You’ll also set up a free account at https://github.com along with the new, private repository, hello-python. (“Private” means that only you have access to the files it contains.)
Now, you still need an editor. We suggest using the free program Visual Studio Code (VS Code), which has particularly good Git support. After installation, press (F1) to open the command palette and run Git > Clone. In the small dialog box, you must enter the URL of your repository in the following format:
https://github.com/<accountname>/hello-python.git
Don’t forget the .git extension when copying the URL from the web browser. If you’re accessing GitHub for the first time in VS Code, you’ll need to authenticate. VS Code redirects you to the GitHub website for this purpose. The process is a little bit tricky and doesn’t always succeed on the first try. As soon as everything works, VS Code remembers the identification token acquired in this way and can use it to access your account in the future.
Reauthenticating: If you’ve previously used VS Code for another GitHub account, you’ll only have access to that account’s repositories as well as to public repositories. Before you can access another account’s private repository, you must delete the previously stored authentication credentials.
On Linux, you can execute the Sign Out command in VS Code via the Accounts icon (usually the second-to-last icon in the sidebar). On Windows, you must start the Windows Credential Management program, go to the Windows Credentials dialog box, and delete the git:https://github.com entry. This step will cause VS Code to ask you to authenticate again the next time you connect.
Generally, Git and VS Code work best if you always use the same account.
VS Code finally asks you for the directory where you want to store the files of the repository locally. For example, select the Documents folder on Windows. VS Code creates a new subdirectory and uses it as the project directory.
Programming and Synchronizing
The EXPLORER view in the VS Code sidebar now shows the project directory, which is empty for now except for a README file. Now, you can add the first file (e.g., helloworld. py) via the context menu, enter the first lines of code, and try out the program. (This example assumes you’ve installed Python on your computer and the Python extension in VS Code.)
When the first program is running to your satisfaction, now is the right time for your first commit. With this action, you’ll save the current state of all files of the project.
Before committing, you must explicitly mark for commit all files that have been changed or newly added to the project. For this step, open the SOURCE CONTROL sidebar by pressing (Ctrl)+(Shift)+(G) or by clicking on the Source Control menu icon (see figure below [1]). In the SOURCE CONTROL sidebar, click the plus button (Stage Changes), as shown in (2), for all files that should be part of the commit.
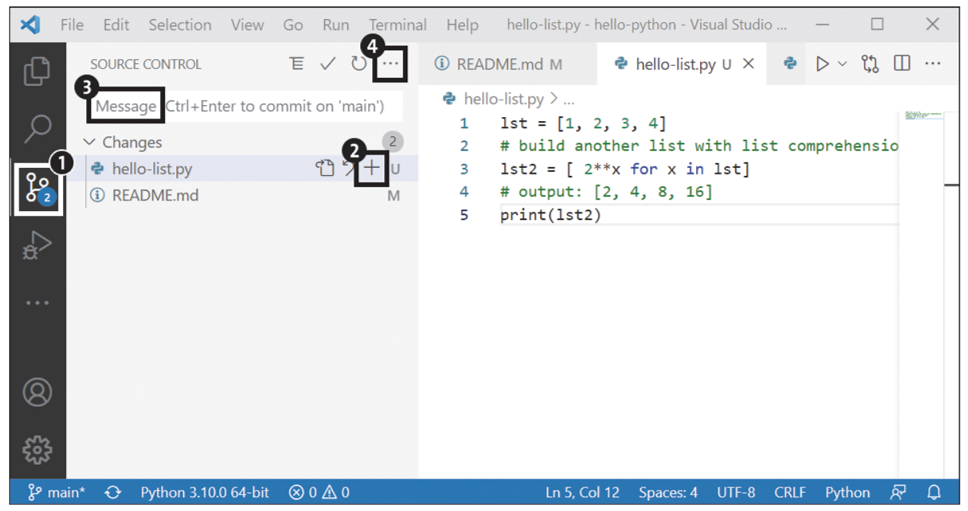
Then, in the Message field, enter a short text summarizing the most recent changes made to the code (3). Pressing (Ctrl)+(Enter) executes the commit. If you forget to mark files for commit, VS Code will ask if it should simply include all new and changed files in the commit.
With the commit, VS Code has simply created a local snapshot of all your files. If you want your commits to be backed up to the external Git repository as well (i.e., GitHub in our case), click the three dots (...) menu button in the SOURCE CONTROL sidebar (4) and execute the Pull, Push > Sync command. Behind the scenes, this step runs both git pull and git push. So, any changes occurred in the external repository that haven’t yet been downloaded to your machine will be downloaded at the same time.
The Git Time Machine
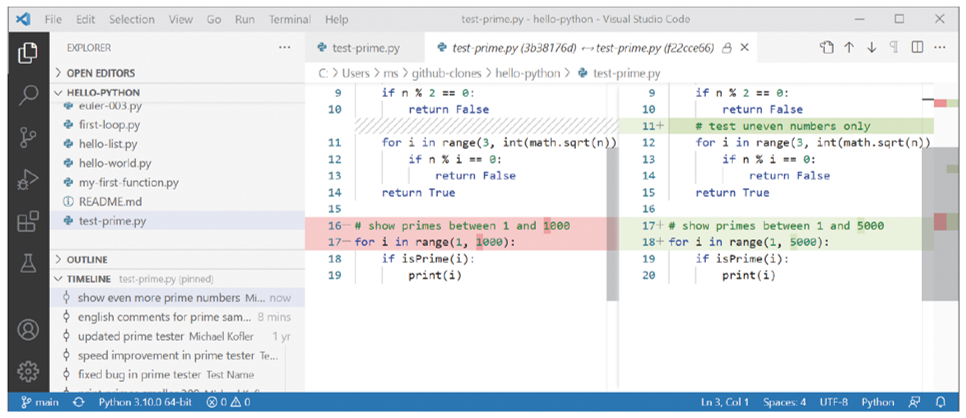
The advantages of Git become clear when you want to test an example again after some time and problems arise. You can’t exactly tell when the error happened. In VS Code EXPLORER view, execute the Open Timeline context menu command on the affected file. VS Code not only shows all commits where the affected file has been changed; clicking on the commit also immediately makes clear what changes have been made.
However, VS Code doesn’t give you an immediate way to restore an old version of a file. The GitLens extension provides this function, however. Alternatively, you could also familiarize yourself with the git restore command (outside of VS Code).
Editor’s note: This post has been adapted from a section of the book Git: Project Management for Developers and DevOps Teams by Bernd Öggl and Michael Kofler. Bernd is an experienced system administrator and web developer. Since 2001 he has been creating websites for customers, implementing individual development projects, and passing on his knowledge at conferences and in publications. Michael studied telematics at Graz University of Technology and is one of the most successful German-language IT specialist authors. In addition to Linux, his areas of expertise include IT security, Python, Swift, Java, and the Raspberry Pi. He is a developer, advises companies, and works as a lecturer.
This blog post was originally published 1/2024.


Comments