The easiest way to install Node.js on your system is to use existing packages for your system.
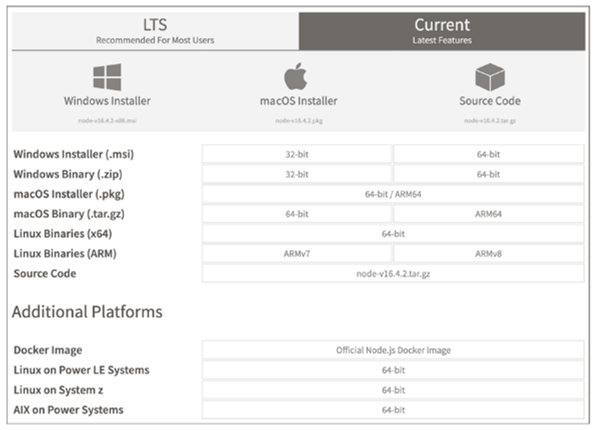
The advantage here is that you can use your system’s package manager, which does most of the work for you during the installation phase. You don’t need to worry about resolving dependencies here, so you can install Node.js on your system with just a few lines on the command line or a few clicks, depending on which operating system you’re using. Node.js is an open-source project, so it’s available free of charge from https://nodejs.org/en/download/current/. There you have the choice between the LTS version, which is recommended for most users, and the current version, which contains the latest features. You can also download the packages for different operating systems and computer architectures to your computer using the respective links. The table in the figure below shows the different versions available for download.
Each of the following sections covers the installation of packages for a particular operating system.
Linux
This section describes how you can install Node.js on a Linux system. In this context, you have two different options for installing Node.js. The first one consists of installing the Linux binaries that you can download from http://nodejs.org. The use of the package manager of the operating system represents the second option.
Installing the Linux Binaries
In the first installation variant, the distributions don’t differ because the Linux binaries package already contains the executables, and the package only needs to be unpacked and correctly integrated into the system. According to the Filesystem Hierarchy Standard (FHS) for Unix systems, the /opt directory serves as a container for additional software, so this directory is a suitable location for the Node.js Linux binaries. The installation of the packages is described below.
$ cd ~
$ wget https://nodejs.org/dist/v16.8.0/node-v16.8.0-linux-x64.tar.xz
--2021-09-03 11:34:59-- https://nodejs.org/dist/v16.8.0/node-v16.8.0-linuxx64.
tar.xz
Resolving nodejs.org... 104.20.23.46, 104.20.22.46
...
$ cd /opt
$ sudo tar xvf ~/node-v16.8.0-linux-x64.tar.xz
[sudo] password for <username>:
node-v16.8.0-linux-x64/
...
$ sudo ln -s node-v16.8.0-linux-x64 nodejs
$
This shows you how to download the Node.js Linux binaries package without a graphical user interface (GUI). To do this, you use the wget command-line tool. It downloads the package from the web server http://nodejs.org. After that, it will be unpacked in the /opt directory. To install software in this directory, you need a root permission, which, in this case, you can obtain via the sudo command. In the final step, a symbolic link with the name nodejs to the directory is created, so you’ll save some typing work in the further course and avoid mistakes when writing the complete directory name. At this point, you can already use Node.js on the command line by addressing the node executable with its absolute or relative path specification. However, this in turn means that you have to enter a disproportionately long command each time you call it, depending on where it’s stored. In addition, it’s easy for errors to creep in. The goal now is to call Node.js directly by entering the node command, which you can easily do by including the bin directory within the Node.js installation in the system’s search path. Below shows the command lines required to expand the search path accordingly.
$ PATH=$PATH:/opt/nodejs/bin
$ export PATH
After typing the two lines shown above in your command-line tool, you can use Node.js. The only problem now is that you have to reenter these commands for each shell session because the search path extension isn’t persistent. The solution to this is to include these lines in one of the system-wide configuration files. Because you’re making adjustments to an environment variable in this case, the /etc/profile file is recommended at this point. Here, you just add the two lines to the end of the file, and Node.js is available on the command line every time you log in to the system. Finally, to activate the change in the current shell, you must enter the source /etc/profile command, which ensures that the file will be retrieved again.
Installation via Package Manager
The second, better option of installing Node.js on Linux systems depends on the package manager of the respective distribution. Below shows how to install Node.js on an Ubuntu system with just a few steps.
$ sudo apt-get install nodejs
The command uses the version that is stored in the default repositories. If you install Node.js in this method, the advantage is that the software is automatically updated as soon as a new version becomes available in the repository. The disadvantage of this type of installation is that the versions are updated quite slowly so the latest version is rarely available. However, you can include an additional repository that provides you with the latest version of Node.js as a package and can be updated automatically if a new version is released. Below shows the individual steps you need to perform to include the repository and install Node.js from it.
$ curl -fsSL https://deb.nodesource.com/setup_16.x | sudo -E bash -
$ sudo apt-get install -y nodejs
2
As with most operations involving package manager, you need to have root permissions again, and the easiest way to obtain this is using the sudo command.
There is one drawback to installing Node.js via the system’s internal package manager:there is only one version of Node.js available to you. If you want to test your application on different versions of Node.js, you can either use Node.js via the Linux binaries or use a tool such as Node Version Manager (nvm; https://github.com/creationix/nvm), which allows you to run multiple versions in parallel. Apart from that, the only way left is to use several self-compiled versions of the platform.
Once you’ve successfully completed these steps, you’ll have a fully functional installation of the Node.js platform on your system and can start developing your own applications. To check if the installation completed successfully, you should retrieve the version information of your Node.js installation. Below shows how to call Node.js to retrieve the version information.
$ node -v
v16.8.0
If you see the correct version number, it means that the installation was successful, and you can start using Node.js.
Uninstalling
The way you remove Node.js from your system depends predominantly on how you installed the platform. For the Linux binaries, you should delete the directory that you unpacked during the installation and remove the entries from the /etc/profile file.
If you installed Node.js via your system’s package manager, you can also use this tool to remove it. On Ubuntu systems, you must run the commands shown here.
$ sudo apt-get remove --purge nodejs
$ sudo apt-get clean
The apt-get command with the remove option ensures that the Node.js installation on your system is deleted. With --purge, you can also remove any configuration files created during the installation from the system. The next command, apt-get with the clean option, is responsible for flushing the package cache and thus freeing the occupied space. The package cache contains the packages that were downloaded for installation. Thus, Node.js can be completely removed from the system.
Windows
Originally, Node.js was only available on Linux. If you wanted to install it on Windows, you had no choice but to run it using Cygwin. This project can be found at www.cygwin.com. Cygwin provides a Linux-like environment on Windows to run Linux software there. As of version 0.6, however, a lot of things have changed in terms of support for different platforms. With the introduction of the libuv library and the concurrent abstraction of libev and libeio, it became possible to run Node.js natively on Windows without any further workaround or additional software. The Node.js download page provides both an executable binary package of Node.js and an .msi package for installing Node.js. Node.js can run on almost any Windows platform. Support ranges from Windows 2000 to Windows 10 for desktop systems. However, Node.js can also be installed on Windows server systems. In addition, Node.js is available on the Microsoft Azure cloud platform, making cloud applications with Node.js possible.
Binary Package
The easiest way to run Node.js on Windows is to use the binary package. You just need to download it and then use it without any further installation. Node.js can then be launched in two different ways, either by double-clicking the node.exe file or via the command line. Below shows how you can check whether or not Node.js runs on your system. Here it’s assumed that the node.exe file is located directly in the root directory on your hard disk. However, you can also place the file in any other directory.
C:\>node.exe -v
V16.8.0
Using the binary version of Node.js on Windows has some significant drawbacks. For example, you can’t start Node.js from anywhere in the command line with just the node command. To achieve this, you must manually extend the system’s search path or place the file in a directory that is already included in the search path. Another disadvantage of this option is that you can only use the Node.js platform with the binary, but not npm, which you can find at https://npmjs.com. You can get around these disadvantages by using the second method of running Node.js on Windows.
Microsoft Software Installer
On the download page of https://nodejs.org, there is also a Microsoft Software Installer (i.e., .msi) package available in addition to the binary package, which you can use to install Node.js. In just a few steps, you’re guided through the installation, and then you can start using Node.js on your system.
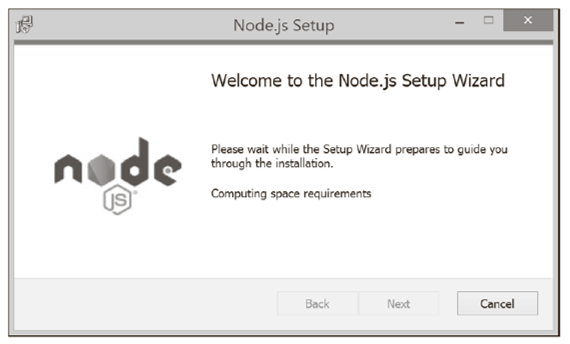
After double-clicking on the Node.js installer package, the interactive installer will launch, and you’ll be in the welcome window shown in this figure.
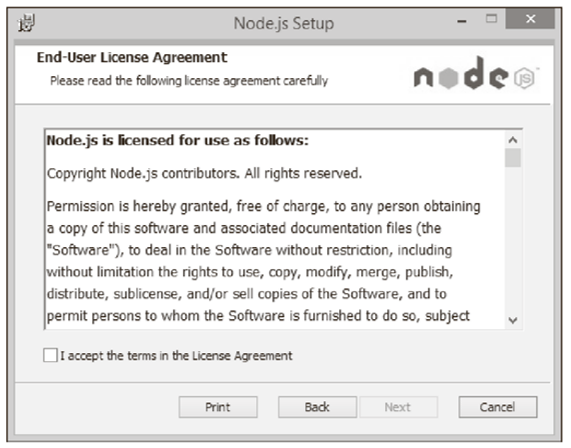
The Next button takes you to the second step of the installation. Here you’re presented with the license information for Node.js, which you must accept by checking I accept the terms in the License Agreement.
At this point, you have the option to print the license information, go back to the first step, or accept the license conditions, as shown below. (By the way, you can cancel the installation process at any time by clicking the Cancel button.)
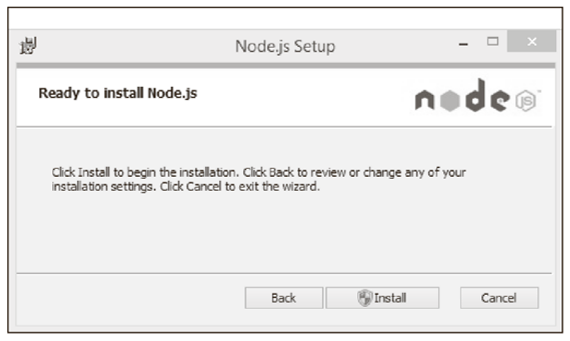
Once you’ve checked the box, use the Next button to select the target directory for the installation. The default value here is C:\Program Files\nodejs. Once you’ve set the installation target, you can select the components to install, with the default selection including all required components. Then click the Install button to start the actual installation of Node.js as shown in the next figure. This involves copying the necessary files to the right locations in the system and registering the software so that you can use Node.js on your system.
Once all the tasks required for you to run Node.js on Windows have been completed, the display switches to the final step of the installation. Then you can finish installing Node.js via the Finish button as shown here.
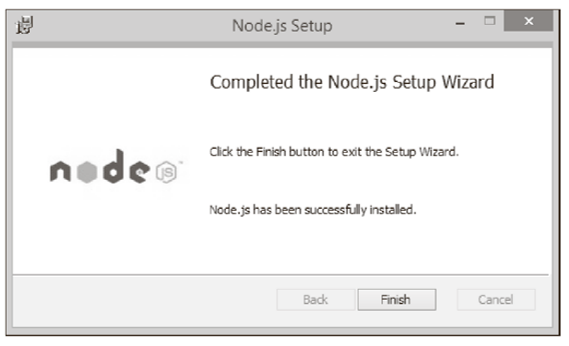
When the setup window is closed, you can open the command prompt window (cmd.exe) and check whether the installation of Node.js on your system was successful. For this purpose, as shown below, you must run the node command along with the -v option to retrieve the version information.
C:\>node -v
v16.8.0
If you installed Node.js using the .msi package, you should note that Node.js is now available to you system-wide on the command line, and you don’t need to customize any environment variables. This means you can start implementing your first application with Node.js.
Uninstalling
If at any time you want to remove Node.js from your system, that’s no problem either. Depending on how you proceeded with the installation, you can choose one of two ways to delete Node.js from your Windows system. If you use the Windows binaries of Node.js, you only need to remove the node.exe file from your system. If you’ve installed Node.js on your system using the .msi package, you can use Windows Package Manager to uninstall Node.js.
You can get to the control panel in Windows via Windows Explorer by selecting Computer on the left and then Computer on the menu bar. After that, you must click on Control Panel. There, the Uninstall program link under the Programs item will take you to an overview where you can select the Uninstall program item under Programs and Features to get a list of all installed software components on your system. In this list, select the node.js entry, and then click Uninstall to remove Node.js from your system.
macOS
As is the case for Windows, a binary package and an installer package for installation are available as downloads for macOS systems.
Binary Package
The easiest way to run Node.js on macOS is to use the binary package. The package is available as a zipped tar archive, and all you have to do is unzip it on the command line, as shown here.
$ wget https://nodejs.org/dist/v16.8.0/node-v16.8.0-darwin-x64.tar.gz
$ tar xvzf node-v16.8.0-darwin-x64.tar.gz
$ cd node-v16.8.0-darwin-x64
$ bin/node -v
v16.8.0
As you can see, Node.js can be used directly after unpacking. Using the -v option, you can display the version information and thus check whether it’s the correct version and whether Node.js will basically work. The big disadvantage of installing the binary package is that Node.js won’t be available system-wide via the command line. But there’s a solution to this problem: using the installer.
Installer Package
To start the installation, you must double-click the downloaded .pkg file. You’ll then be guided through a multistep interactive process that results in a working installation of Node.js. The figure below shows the first step of the installation, which tells you that Node.js and npm will be installed into the /usr/local/bin directory. Click Continue to move on with the installation.

In the subsequent step of the installation, you’ll be presented with the Node.js license terms. Here, as you can see below, you can choose different languages in which the corresponding information will be displayed to you. You can also print the license terms or save them to your system.
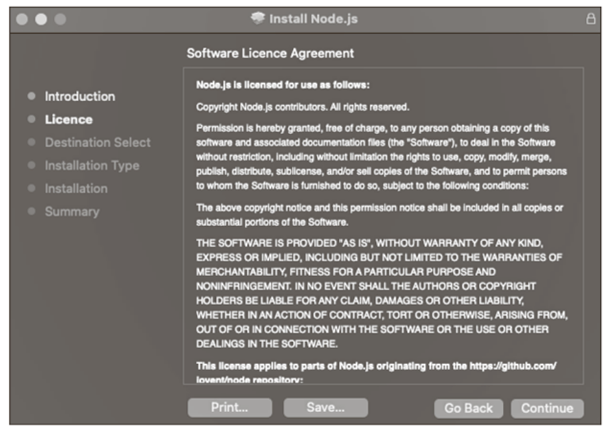
As you move through the installation process, you can always return to the previous installation step by clicking the Go Back button. After clicking Continue, a separate popup window prompts you to agree to the license terms and proceed with the installation. You have the choice to either agree—by clicking the Agree button—and thus continue the installation process, or disagree and thus cancel the installation.
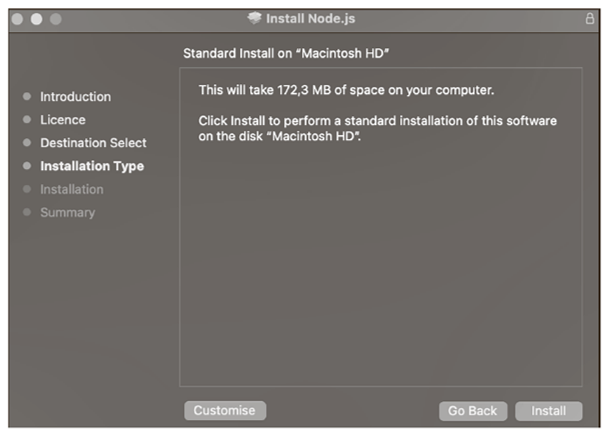
Once you’ve accepted the license terms, the next question you’ll be asked is about the partition you want to install Node.js on. The Continue button will take you to the next step, where you’ll select the type of installation. To proceed with the standard installation, click Install.
At this point, you need to enter your user name and the corresponding password so that the software can be installed correctly on your system. Once you’ve provided and confirmed these details, the actual installation of Node.js will begin, and the files will be copied from the installer package to the system. From this point on, you can no longer return to a previous step via Go Back.
When all the files are copied, the installation is complete, and you’ll get a short summary similar to the one shown here.
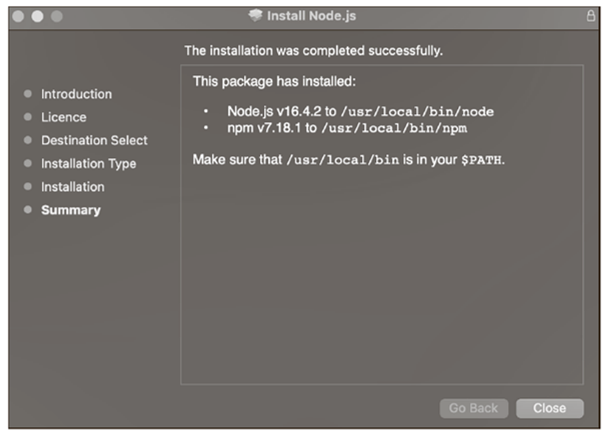
Now you find out where Node.js and npm were installed and which directory you need to include in your PATH variable so that you can use Node.js on the command line with the node command without having to include the full path. By default, the /usr/local/ bin directory is in the system search path, as shown in this listing.
$ echo $PATH
/usr/bin:/bin:/usr/sbin:/sbin:/usr/local/bin:/usr/X11/bin
If you’ve followed the steps of installing Node.js as described, you can now use the platform. To make sure that you’ve really installed the latest version and that Node.js works correctly, you can retrieve the version information via the command line, as shown here.
$ node -v
v16.8.0
Uninstalling
If you want to remove Node.js from your system, you can simply delete the previously unpacked directory again, provided you use the binary package.
If you’ve installed Node.js via the installer, when uninstalling, you’ll benefit from the fact that the pkg installer logs the files that are copied to your system. You can find that information under /var/db/receipts/ in the files org.nodejs.node.npm.pkg.bom and org.nodejs.pkg.bom. The .bom file extension stands for bill of material. These files record the location of the files relative to the location of the installation. Because all pieces of information, such as the file list and also the location of the installation, are in binary format, you can use the pkgutil tool to output the information. The pkgutil tool uses the names of the respective packages. The name of your Node.js package is org.nodejs.pkg. As shown in this listing, the metadata can be viewed using the –pkginfo option.
$ pkgutil --pkg-info org.nodejs.node.pkg
package-id: org.nodejs.node.pkg
version: v16.8.0
volume: /
location: /
install-time: 1526228155
This shows that you’ve installed Node.js on the / volume via the usr/local path. This path represents the prefix for the file list you can obtain from the .bom file, as shown here.
$ pkgutil --lsbom org.nodejs.node.pkg
.
./usr
./usr/local
./usr/local/bin
./usr/local/bin/node
./usr/local/include
...
In previous versions, pkgutil could use an option called --unlink to completely delete a package. This option has been removed in newer versions because removing a package can affect other installed software applications on your system. For this reason, you should act with extreme caution if you want to remove software that was installed using the pkg installer. In the simplest case, you should remove the installed files manually or create a shell script that iterates across the file list and removes the files. Once you’ve removed the files of the package, you can also remove the package information using pkgutil, as shown here.
$ sudo pkgutil --forget org.nodejs.pkg
Installing Node.js via a prebuilt package has many advantages. First of all, you’re dealing with a hassle-free installation process and don’t have to consider any dependencies. In addition, you can remove these packages from the system again afterwards. But there is yet another installation option available: download the source code of Node.js, compile it yourself, and install it on the system.
After following the installation steps, you now have a running version of Node.js that you can use to develop your own applications.
Editor’s note: This post has been adapted from a section of the book Node.js: The Comprehensive Guide by Sebastian Springer. Sebastian is a JavaScript engineer at MaibornWolff. In addition to developing and designing both client-side and server-side JavaScript applications, he focuses on imparting knowledge. As a lecturer for JavaScript, a speaker at numerous conferences, and an author, he inspires enthusiasm for professional development with JavaScript. Sebastian was previously a team leader at Mayflower GmbH, one of the premier web development agencies in Germany. He was responsible for project and team management, architecture, and customer care for companies such as Nintendo Europe, Siemens, and others.
This post was originally published 7/2023.


Comments