In this blog post, we’ll walk you through installing a GitLab server on your own hardware step by step.
To avoid difficulties as much as possible, we recommend a dedicated server or an appropriate cloud instance that is reserved exclusively for GitLab. You can rent a virtual server that meets the hardware requirements for a few dollars per month. We’ll describe the recommended installation method using the operating system’s package manager; however, you can also run GitLab as a Docker container or compile it from the source code.
The (virtual) hardware for our test server has the following key data:
- 2 (v) CPUs
- 4 GB RAM
- 40 GB SSD
Of course, your server must be accessible via the internet and should have a valid Domain Name System (DNS) record because of transmissions are encrypted. We’ll use gitlab.git-compendium.info for this purpose. Our operating system is Ubuntu 20.04, which is officially supported with packages from GitLab alongside Debian, CentOS, and openSUSE.
Cloud Installation: GitLab also provides images and installation instructions for self-hosted GitLab instances in the cloud. Whether through Microsoft Azure, Google, or Amazon or in an existing Kubernetes cluster, the instructions on the GitLab website are quite detailed and are available at the following link: https://about.gitlab.com/install.
From many years of experience, we’re used to installing complex systems and know the time involved. For this reason, we were astonished when we got GitLab running and fully operational with valid SSL certificates on our server in less than 5 minutes and in only one installation attempt.
First, you must install the necessary add-on packages and configure postfix to allow your server to send email. GitLab needs the email functionality for notifications, especially for resetting passwords.
sudo apt update
sudo apt install curl openssh-server ca-certificates postfix
We’ll use gitlab.git-compendium.info as the system mail name in the postfix configuration, which allows for the sent emails to have gitlab@gitlab.git-compendium.info as the sender. Next, you must add the GitLab packages directory to your package manager. GitLab has a small shell script that will do this step for you automatically:
curl https://packages.gitlab.com/install/repositories/gitlab/\
gitlab-ee/script.deb.sh | sudo bash
Note that the URL must be written on one line, of course. The APT package manager has been extended with the entry /etc/apt/sources.list.d/gitlab_gitlab-ee.list. In addition, the script updated the local package cache.
Finally, enter the following command:
sudo EXTERNAL_URL="https://gitlab.git-compendium.info" apt-get \
install gitlab-ee
At this point, you’ve started the installation process. All components for the system are packed into one package (of over 800 MB). Now is a good time to grab a cup of coffee because unpacking the files, initializing the databases, and creating the certificates will take a few minutes. In the console window, you can closely follow the progress of the installation, with important information highlighted in color. Among the final output on the console, you’ll see the following note that the initial password is in a file on your server:
Notes:
Default admin account has been configured with following details:
Username: root
Password: You didn't opt-in to print initial root password to
STDOUT.
Password stored to /etc/gitlab/initial_root_password. This file
will be cleaned up in first reconfigure run after 24 hours.
Next, open https://gitlab.git-compendium.info in your browser or the address you used during the installation.
On the start page, you must use the password stored in the file for the administrator account with the user name root.
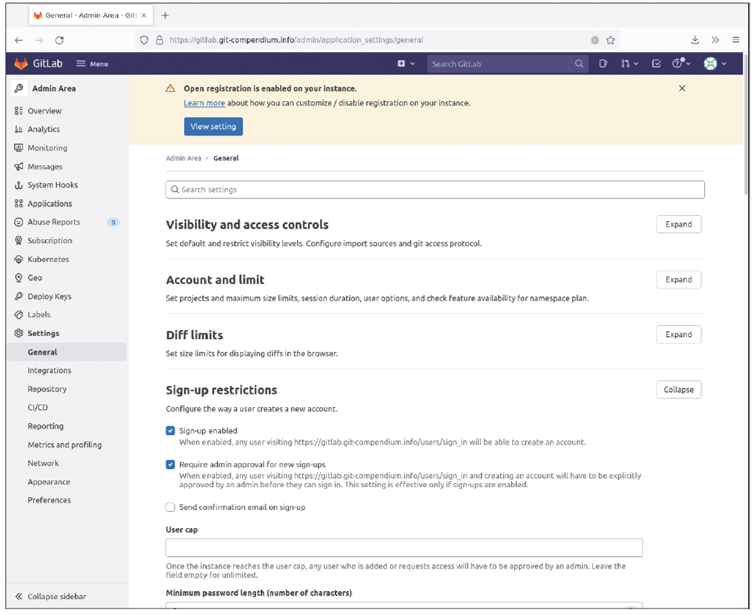
Perhaps you noticed the Register now link in the logon window? After the default installation, users can create an account on your new server. If you don’t want this feature available, you should log on as the root user and disable the function under Menu > Admin > Settings > General > Sign-up restrictions. GitLab also indicates this condition clearly in the user interface (UI).
Now, you can create a first user in your GitLab instance. (We recommend that you don’t use the root user for normal work with GitLab.) After logging on with your own user, GitLab alerts you that you haven’t stored an SSH key yet. Your GitLab instance is now fully operational.

Installing GitLab Runner
As a final step of the installation, we’ll show you how to install and activate GitLab Runner. The continuous integration (CI) pipelines are an outstanding feature of GitLab. Basically, pipelines aren’t unlike Git hooks. Upon closer inspection, however, you’ll quickly see that pipelines are far more flexible and powerful. In a pipeline, different sections (jobs) are executed, either simultaneously or sequentially, and jobs can be logically linked to the result of other sections.
Pipelines aren’t executed directly on the GitLab instance but instead operate on any computer, the runner, which communicates with GitLab over the internet. The system is extremely flexible since the runners can run on different operating systems and serve different executors simultaneously. Behind this terminology is the environment in which the jobs are processed. The following three components in particular are worth mentioning:
- Shell: Jobs are executed in the shell of the operating system: on Linux/macOS, in Bash and, on Windows, in PowerShell. The execution is performed as a standalone user on the computer running the runner, and the programs needed to run the pipeline must be installed on the computer.
- Docker: Provides a clean environment at every startup. You can use your own Docker images for pipeline execution with all necessary programs installed. Compared to the shell runner, this environment is much more flexible and scalable.
- Kubernetes: Uses containers in an existing Kubernetes cluster. If you already use Kubernetes anyway, you can run your runners here as well without requiring any more hardware.
Runners can also start a virtual machine (VM) like VirtualBox or Parallels or access a remote server via SSH and run pipelines there. We won’t describe these special cases any further, but we will install a runner on a current Ubuntu Linux system. Quite commonly, a GitLab instance will have multiple runners registered from different computers. For example, a runner can also be installed on your laptop, which is online only when you’re working.
To install a runner on a current Ubuntu/Debian system, you should download the Debian package (gitlab-runner_amd64.deb) from https://gitlab-runner-downloads.s3.amazonaws.com/latest/index.html. Before doing so, make sure that the Git and Docker programs are installed:
sudo apt install git docker.io
curl -LJO https://gitlab-runner-downloads.s3.amazonaws.com/\
latest/deb/gitlab-runner_amd64.deb
sudo dpkg -i gitlab-runner_amd64.deb
During the installation of the Debian package, a new gitlab-runner user was added. To allow this user to use Docker, you still need to add it to the appropriate group with the following command:
sudo usermod -aG docker gitlab-runner
This step completes the installation of the runner, and you should see the active status in the output of the following command:
systemctl status gitlab-runner
. gitlab-runner.service - GitLab Runner
Loaded: loaded (/etc/systemd/system/gitlab-runner.servi...
Active: active (running) since Sat 2022-02-19 10:39:31 ...
...
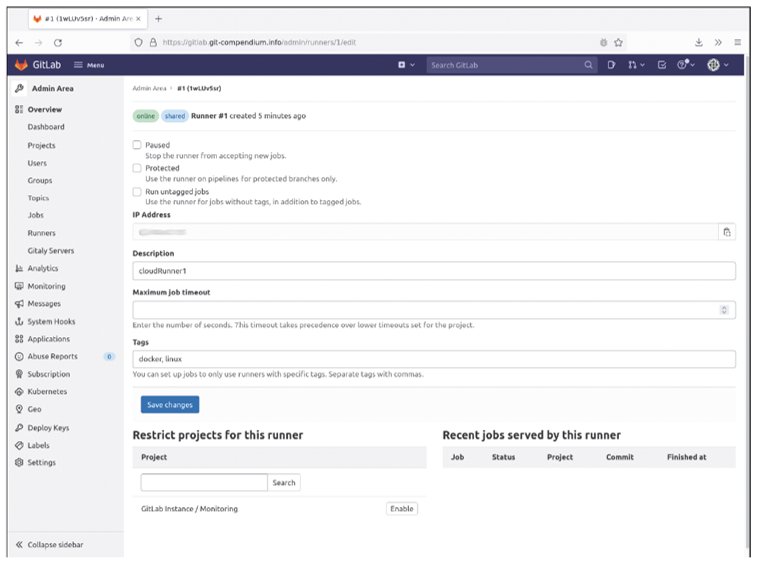
To register the runner with your GitLab instance, you must navigate to Admin > Runners on the web interface. Click the Register an instance runner button to find the token you need for the following registration. Now, start the registration process in the command line of your future runner:
sudo gitlab-runner register --non-interactive \
--registration-token xxxxxxxxxxxxxxxxxxxx \
--run-untagged \
--name cloudRunner1 \
--url https://gitlab.git-compendium.info/ \
--executor docker \
--locked=false \
--docker-privileged \
--docker-image ubuntu:latest
Runtime platform arch=amd64 os=linux pid=2076146 rev...
Running in system-mode.
Registering runner... succeeded runner=xxxxxxxx
Runner registered successfully. Feel free to start it, but...
This command shown starts the installation in non-interactive mode. You can also call sudo gitlab-runner register to be guided through the steps on the command line. Note, however, that the --docker-privileged and --locked=false settings can only be set directly via a command-line call.
Unfortunately, to enable certain operations in Docker executor, the container must be started in privileged mode. This approach, however, isn’t a particularly good idea from a security point of view, but since the runner shouldn’t run on an important server anyway, the security aspect isn’t a priority in this context. By default, runners are available only for pipelines that use a tag that is also assigned to the runner. You can either set this setting at the command line with --tag-list or change it in the web interface under Admin > Runners > Tags.
If the runner has been successfully registered, nothing stands in the way of CI/continuous deployment (CD) pipelines on your GitLab instance.
Backup
Before you dive into the GitLab interface after this fairly simple installation and as server administration tasks take a back seat, let’s consider how you can set up an automatic backup for your GitLab platform. Even if you only use your GitLab instance for personal purposes and a server failure doesn’t have far-reaching consequences, a backup is still essential, especially when it’s as easy to do as with GitLab.
Not for Runners: The configuration of GitLab Runner resides on the particular computer on which the runner is running. However, since a runner can be re-registered with only one command, we don’t include special backup instructions for runners here.
The installation of GitLab includes its own backup script that creates a database dump for you and backs up all other files belonging to your GitLab projects. For this process, you must simply call the script gitlab-backup:
root@gitlab:~# gitlab-backup
2022-02-19 11:05:10 +0000 -- Dumping database ...
Dumping PostgreSQL database gitlabhq_production ... [DONE]
2022-02-19 11:05:13 +0000 -- done
2022-02-19 11:05:13 +0000 -- Dumping repositories ...
...
Deleting old backups ... skipping
Warning: Your gitlab.rb and gitlab-secrets.json files contain
sensitive data and are not included in this backup. You will
need these files to restore a backup. Please back them up
manually.
Backup task is done.
The script creates a TAR file in the /var/opt/gitlab/backups folder, using the timestamp, the current date, and the extension -ee_gitlab_backup.tar as the filename. As this file is a backup of the application data, it doesn’t include the configuration files of your GitLab instance, as indicated by the warning message at the end of the backup process. The central configuration file gitlab.rb and the JavaScript Object Notation (JSON) file gitlabsecrets.json must be backed up separately. GitLab provides a script for this requirement as well, activated by the following command:
gitlab-ctl backup-etc /var/backups/gitlab-etc
This step saves the configuration files in a TAR file in the /var/backups/gitlab-etc folder. GitLab recommends storing this backup separately from the application data backup. In the GitLab interface, among other things, you can create secret variables that are encrypted by the settings in gitlab-secrets.json. If an attacker gets a hold of a backup of the application data but doesn’t have the secret keys, the information is still unreadable.
For an automated backup via Cron, we recommend some more parameters when calling the backup script. For instance, CRON=1 suppresses the output of messages when no errors occur, which results in you only receiving email notifications from Cron when something has gone wrong. In addition, not backing up the container registry with every backup may make sense since exceptionally large amounts of data can accumulate in the container registry. You can use SKIP=registry to prevent Docker images from being backed up. With a comma separator, you can exclude other modules too, for example, uploads for attachments in the wiki or lfs for Git large-file support (LFS) objects.
Backup Functions: Other useful features when creating backups of GitLab application data include uploading finished backups to cloud storage or automatically deleting old backups. These and other options for GitLab backups can be found on the relevant help pages at the following link: https://docs.gitlab.com/ee/raketasks/backup_restore.html.
Editor’s note: This post has been adapted from a section of the book Git: Project Management for Developers and DevOps Teams by Bernd Öggl and Michael Kofler. Bernd is an experienced system administrator and web developer. Since 2001 he has been creating websites for customers, implementing individual development projects, and passing on his knowledge at conferences and in publications. Michael studied telematics at Graz University of Technology and is one of the most successful German-language IT specialist authors. In addition to Linux, his areas of expertise include IT security, Python, Swift, Java, and the Raspberry Pi. He is a developer, advises companies, and works as a lecturer.
This blog post was originally published 3/2024.


Comments